
At Brookhaven Hospital, the chilling horror game developed by Bloober takes center stage. The intricate maze-like structure of this nightmare dungeon means that each puzzle builds upon the last, becoming increasingly complex until they’re inseparable. Consequently, I’ve decided to provide a comprehensive walkthrough for this part of the game, emphasizing the puzzles and crucial moments.
Instead of guiding you step-by-step, I’ll provide you with essential information about significant obstacles, tricky parts, and locations of crucial items to help you navigate smoothly.
Note: This walkthrough is intended for Normal and Hard difficulties.
SH2 remake’s Brookhaven Hospital Reception padlock: Nurses, Doctors, Trees – Normal Difficulty
To access the basement at Brookhaven Hospital in the Silent Hill 2 remake, you’ll first have to solve the padlock code located close to the lobby upon entering.
Following the instructions from the note left by the receptionist, I’m heading straight for Examination Room 3 to check in with the head nurse. Let’s see what’s up!
Break open the door and you’ll discover a note hidden inside a drawer. The message says: “I’ve written it out for you so that hopefully, you won’t forget this time. When you reach the lobby, take a good look around. Keep in mind the following sequence: Nurses, Doctors, Trees.
I’m talking about the snaps scattered around the gaming hub. There, you’ll spot images of seven nurse characters, along with a couple of docs, and four tree-like backdrops.
The combination is: 724
Continue on and you’ll eventually reach the second floor.
At Brookhaven Hospital’s 2nd floor Nurses Station, you’ll find a note on the door stating: “The code has been changed to what we discussed in yesterday’s meeting in the doctor’s lounge. Please avoid jotting it down on slips of paper as I don’t want to discover them. Let’s all be mindful and responsible.
You’ll get this a bit later as you track down the bracelets for the Director’s Office.
SH2 remake’s Brookhaven Hospital Reception padlock – Hard Difficulty
The note in Exam Room 3 is different on hard difficulty and it now reads:
“If two is the number of nurses you’d still be one short. As two are dead and one is a fraud.
The third chops the firewood in half.
The first is singular.”
1. To start, we have one, which is simply a single number.
2. The second refers back to the image of nurses. Here’s how you should handle it: Subtract three and then add one, ending up with five.
3. For the third part, if you halve the number of trees at the hospital, you will be left with two.
The combination is: 152
SH2 remake’s Director’s Office bracelets
Initially, make your way to the Women’s Locker Room, which is where the shotgun is located. Interact with the teddy bear there to obtain the Bent Needle. While you’re there, don’t forget to unlock the door next to the Treatment Room, which is close to the stairs as well.
Afterward, make your way to the cozy and familiar space known as the Nurses’ Lounge. Once there, secure the L1 Room Key for yourself. In the L1 room, maneuver a cart near an opening that I can scramble through. Leap through it into the adjoining room, then bounce back into L1 via the open window to avoid the obstacle of furniture cluttering the rest of the space. With this detour, you’ll find yourself in the Utility Room.
By tapping the wall, James will maneuver into a narrow space between the walls, an unexpected turn of events. At ground level, he’ll nudge a locker, revealing a hidden doorway that leads to a room on the first floor, located between Medical Records and Restrooms. You can access this location by crawling through the small space, effectively entering the Medical Records.
In this location, you’ll discover the initial essential item for the Director’s Office – the Marked Bracelet. After you’ve finished with it, make your way back up the stairs and verify on Maria.
Next, proceed to the northwest corner stairs on 2F and climb up. Inspect the metal door at the top, close to the save point, where you’ll encounter Laura once more. Then, move along the corridor’s opposite side. You’ll reach Exam Room 5, where you’ll find the 1F Inner Ward Key. To get it, break the window to enter. From here, you can also access the X-Ray Room. Remember this for future reference, but don’t forget to pick up the Radiograph of a Pelvis and place it in the nearby X-Ray Viewer. Additionally, you can interact with D1 to mark the location of another combination lock.
Now, you’re planning to return to the 1st Floor and utilize the Inner Ward Key for the door connecting the Restroom and Locker Room. After that, take the left corridor and make your way to the Kitchen, where a cleaning agent called Mold Remover can be found. You can pass through the Cafeteria on your way, which will bring you back to the Inner Ward corridor closer to the Dayroom more efficiently.
After that, proceed through the Dayroom and into the Pharmacy, where you can exit via the window into the Garden. In the Garden, navigate towards the northeast direction to reach the Greenhouse, then proceed to the Pool room. In the adjoining Shower Room, you’ll discover a Medical Tube which you can combine with the Bent Needle. Take this combination back to the Pharmacy and use it on the drain, but remember to stop by the Doctor’s Lounge first to grab the Keypad Combination Note. Using the Medical Tube with Bent Needle on the drain will give you the Maintenance Key – head back to the Pool and utilize it on the locked grate to access the Pool Pump and drain the water.
Within the swimming pool, you’ll find a graffiti of an eye; give a whack with your tool against this very wall, and you’ll retrieve the Blood-Splattered Bracelet.
Go back to the Nurses’ Station on the 2nd floor and use the Keypad Combination Note to open it. The note shows a line over the keys you need to press – 3578. Inside, you’ll discover a Moldy Radiograph that can be cleaned with the Mold Remover.
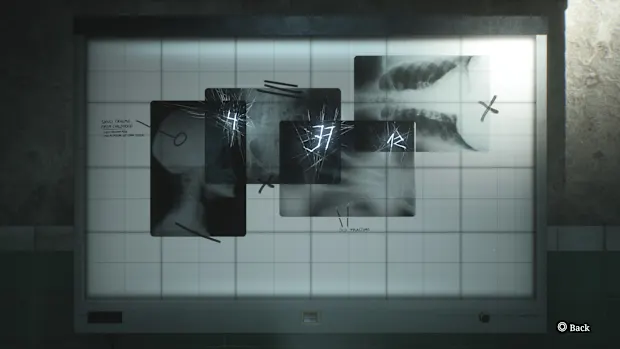
Go back to the X-ray viewer now. Arrange the X-rays on the viewer and align the markings on the photos with those on the whiteboard. If done correctly, a sequence of numbers – 4, 37, 12 – will be highlighted. This combination is for the lock situated outside Room D1, as indicated by the directions painted on the door itself. For your reference, this means turn right for number 4, left for number 37, and again turn right for number 12. Press the “accept” button only after entering all three numbers to unlock the safe. Be cautious not to accidentally overshoot as you rotate the lock!
Inside the room, engage with the bed and you’ll find the ‘Filthy Bracelet’. Now, equipped with all necessities, return to the Director’s Office and interact with the hand resting on the table.
1. Wear the three bracelets on the plastic hand sitting on the Director’s desk, with the stained one at the top and the dirty one at the bottom. Examine the cuts on the fake arm and align them with the uppermost bracelet. The numbers on the other two bracelets should be clean and adjacent to each other. My combinations are 92, 45, 71.
2. Place the three bracelets on the plastic hand found on the Director’s desk, ensuring that the soiled one is at the top and the bloodied one is at the bottom. Inspect the scratches on the artificial limb and ensure they correspond with the uppermost bracelet. The remaining two bracelets should have unsoiled numbers next to each other. My combinations are 92, 45, 71.
3. Arrange the three bracelets on the plastic hand located on the Director’s desk; the dirty one goes at the bottom while the bloodied one takes the top spot. Observe the marks on the fake arm and verify that they align with the uppermost bracelet. For the other two, search for two consecutive, clean numbers. My combinations are 92, 45, 71.
4. Position the three bracelets on the plastic hand resting on the Director’s desk, placing the soiled one at the bottom and the bloodied one at the top. Inspect the cuts on the artificial arm and ensure they match up with the uppermost bracelet. Find two consecutive, unsoiled numbers for the other two. My combinations are 92, 45, 71.
5. Put the three bracelets on the plastic hand sitting on the Director’s desk, making sure the dirty one is at the bottom and the bloodied one is up top. Examine the scratches on the fake arm and make certain they correspond with the uppermost bracelet. For the remaining two, find two adjacent, clean numbers. My combinations are 92, 45, 71.
6. Place the three bracelets on the plastic hand found on the Director’s desk, ensuring that the dirty one is at the bottom and the bloodied one is at the top. Examine the marks on the fake arm and verify they match with the uppermost bracelet. For the other two, look for two adjacent, unsoiled numbers. My combinations are 92, 45, 71.
7. Arrange the three bracelets on the plastic hand resting on the Director’s desk, placing the soiled one at the bottom and the bloodied one at the top. Check the cuts on the fake arm and ensure they align with the uppermost bracelet. For the other two, search for two consecutive, clean numbers. My combinations are 92, 45, 71.
8. Position the three bracelets on the plastic hand sitting on the Director’s desk, making sure the dirty one is at the bottom and the bloodied one is up top. Inspect the scratches on the fake arm and make certain they correspond with the uppermost bracelet. For the remaining two, find two adjacent, unsoiled numbers. My combinations are 92, 45, 71.
9. Put the three bracelets on the plastic hand found on the Director’s desk, ensuring that the dirty one is at the bottom and the bloodied one is at the top. Examine the marks on the fake arm and verify they match with the uppermost bracelet. For the other two, look for two adjacent, clean numbers. My combinations are 92, 45, 71.
10. Arrange the three bracelets on the plastic hand resting on the Director’s desk, placing the soiled one at the bottom and the bloodied one at the top. Check the cuts on the fake arm and ensure they align with the uppermost bracelet. For the other two, search for two consecutive, unsoiled numbers. My combinations are 92, 45, 71.
11. Place the three bracelets on the plastic hand sitting on the Director’s desk, making sure the dirty one is at the bottom and the bloodied one is up top. Inspect the scratches on the fake arm and make certain they correspond with the uppermost bracelet. For the remaining two, find two adjacent, clean numbers. My combinations are 92, 45, 71.
12. Position the three bracelets on the plastic hand found on the Director’s desk, ensuring that the dirty one is at the bottom and the bloodied one is at the top. Examine the marks on the fake arm and verify they match with the uppermost bracelet. For the other two, look for two adjacent, unsoiled numbers. My combinations are 92, 45, 71.
13. Arrange the three bracelets on the plastic hand resting on the Director’s desk, placing the soiled one at the bottom and the bloodied one at the top. Check the cuts on the fake arm and ensure they align with the uppermost bracelet. For the other two, search for two consecutive, unsoiled numbers. My combinations are 92, 45, 71.
14. Put the three bracelets on the plastic hand sitting on the Director’s desk, making sure the dirty one is at the bottom and the bloodied one is up top. Inspect the scratches on the fake arm and make certain they correspond with the uppermost bracelet. For the remaining two, find two adjacent, clean numbers. My combinations are 92, 45, 71.
15. Position the three bracelets on the plastic hand found on the Director’s desk, ensuring that the dirty one is at the bottom and the bloodied one is at the top. Examine the marks on the fake arm and verify they match with the uppermost bracelet. For the other two, look for two adjacent, unsoiled numbers. My combinations are 92, 45, 71.
16. Arrange the three bracelets on the plastic hand resting on the Director’s desk, placing the soiled one at the bottom and the bloodied one at the top. Check the cuts on the fake arm and ensure they align with the uppermost bracelet. For the other two, search for two consecutive, unsoiled numbers. My combinations are 92, 45, 71.
17. Put the three bracelets on the plastic hand sitting on the Director’s desk, making sure the dirty one is at the bottom and the bloodied one is up top. Inspect the scratches on the fake arm and make certain they correspond with the uppermost bracelet. For the remaining two, find two adjacent, clean numbers. My combinations are 92, 45, 71.
18. Position the three bracelets on the plastic hand found on the Director’s desk, ensuring that the dirty one is at the bottom and the bloodied one is at the top. Examine the marks on the fake arm and verify they match with the uppermost bracelet. For the other two, look for two adjacent, unsoiled numbers. My combinations are 92, 45, 71.
19. Arrange the three bracelets on the plastic hand resting on the Director’s desk, placing the soiled one at the bottom and the bloodied one at the top. Check the cuts on the fake arm and ensure they align with the uppermost bracelet. For the other two, search for two consecutive, unsoiled numbers. My combinations are 92, 45, 71.
20. Put the three bracelets on the plastic hand sitting on the Director’s desk, making sure the dirty one is at the bottom and the bloodied one is up top. Inspect the scratches on the fake arm and make certain they correspond with the uppermost bracelet. For the remaining two, find two adjacent, clean numbers. My combinations are 92, 45, 71.
Once you’re right, the hand will unfold, revealing the Director’s Storage Room Key to you.
SH2 remake’s Director’s Office safe
As an avid game enthusiast, I found myself standing before a door next to my recent save point, clutching the Director’s Storage Room Key in my hand. The moment of truth was upon me as I inserted the key into the lock and turned it, revealing a hidden room within. My heart pounded with anticipation as I stepped inside, my eyes immediately drawn to the elusive ‘Safe Button’ that had been missing.
But wait, there was more! A collection of books adorned with intriguing glyphs and numbers lined one wall. This, I realized, was not just any ordinary library; it was a cipher to crack the safe in the Director’s Office. However, before I could embark on this intellectual treasure hunt, I needed to put the books in order by aligning their pictures correctly. Here’s what the final arrangement should look like:
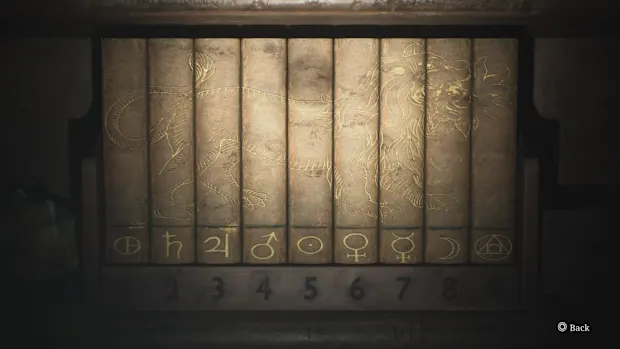
As a gamer, I’m off to the Director’s Office on the other side of the room now. My mission is to find the missing Safe Button there and replace it. Then, I’ve got to figure out the code for the bracelets by matching numbers with symbols on the books nearby. Once I crack the code, the safe will open up, and I’ll snag the Rooftop Key!
After visiting the rooftop, you’ll find yourself engaging in a boss battle and then getting sent back to a different realm, where you’re now trapped. To free yourself, you’ll need to figure out how to open a sequence of locks.
SH2 remake Brookhaven Hospital corrupted
Beginning on the first floor, right beside the common area known as the Dayroom, you’ll notice there’s just one direction to move. Make your way to the elevator and ascend to the second floor. There, you’ll discover the mentioned lockbox stationed next to the Nurses’ Station.
Head towards the exam room in the northwest corner, which is upstairs via the stairs. You’ll spot an ‘Object of Coercion’ near a mannequin once you arrive. Interact with the mannequin’s left arm and utilize the Object of Coercion on its elbow. After that, you can lift its right arm to expose the eye socket, but there’s currently nothing for you to interact with here… for now.
As an enthusiast, I’d bound through the door opposite the dummy and follow the path along its curve. Where the route divides, I’d veer left and smash a breakable wall. Behind it, I’d find a chain guiding me down a ladder. Descending, I’d navigate through Medical Records and squeeze through the crack in the northwest wall to an unmarked room. There, I’d discover the Key of Bliss. Returning up the ladder, I’d employ this key on the mannequin to retrieve the Lapis Eye Key. This newfound artifact would then be used on the lockbox’s center.
As a gamer, I stumbled upon a Calendar Page hidden in M2 (after breaking down the wall from M3). The text on it read: “For a year now, I’ve been under their watchful eyes. So many pills they’ve given me. Every time the clock strikes loudly, I shiver at the touch of each light beam.
To complete this task, please remember to add up the number of pills in the sink, peer through the peephole to observe how many times the outdoor light flashes, check the time displayed on the clock.
Return now to the safe box and input the four-digit code lock. The code for me was 1622. In a year, there are six important moments, it’s 2 in the morning, and there were two brief flashes of light.
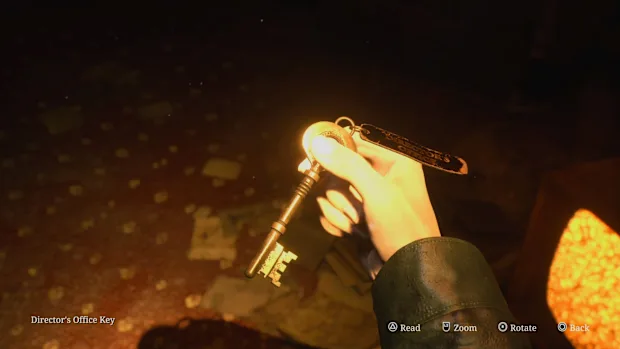
After that, proceed to the Observation Room where you’ll discover the Director’s Office Key lying near a TV. Then, make your way to the Director’s Office.
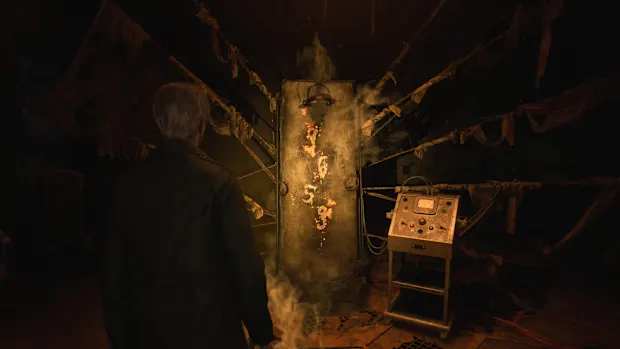
Within, there’s a ladder ascending higher. Here, you’ll find an electric therapy bed, but before reaching it, you must move forward through cushioned chambers first and activate the generator. After completing that task, return and energize the device. The resulting flame will then show the last keypad code: 9659. Enter this sequence on the final control panel.
Following a brief interlude, you’ll find the ‘-1 Elevator Button’. Make your way towards the nearby elevator and insert the button to exit the hospital.
Read More
- Apothecary Diaries Ch.81: Maomao vs Shenmei!
- Mobile MOBA Games Ranked 2025 – Options After the MLBB Ban
- Gold Rate Forecast
- Batman and Deadpool Unite: Epic DC/Marvel Crossover One-Shots Coming Soon!
- Who was Peter Kwong? Learn as Big Trouble in Little China and The Golden Child Actor Dies at 73
- Netflix’s ‘You’ Season 5 Release Update Has Fans Worried
- Hunter Schafer Rumored to Play Princess Zelda in Live-Action Zelda Movie
- SEGA Confirms Sonic and More for Nintendo Switch 2 Launch Day on June 5
- 30 Best Couple/Wife Swap Movies You Need to See
- Gachiakuta Chapter 139: Rudo And Enjin Team Up Against Mymo—Recap, Release Date, Where To Read And More
2025-04-16 13:27