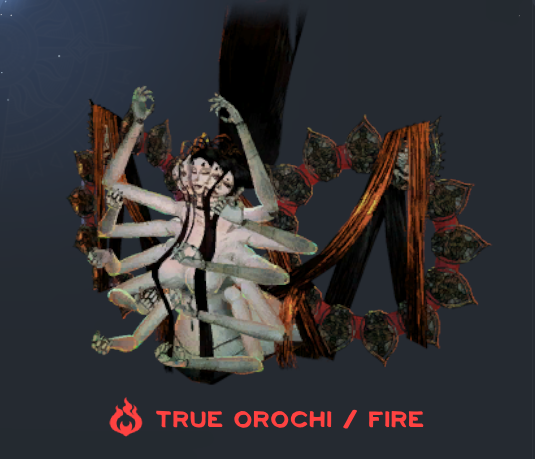
Key Points
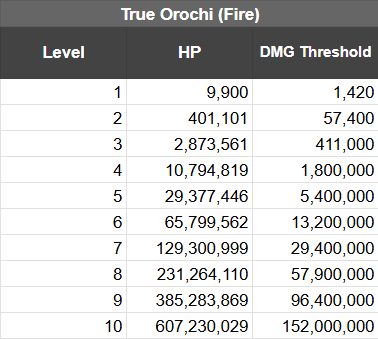
- Level 10 DMG Threshold: 152M.
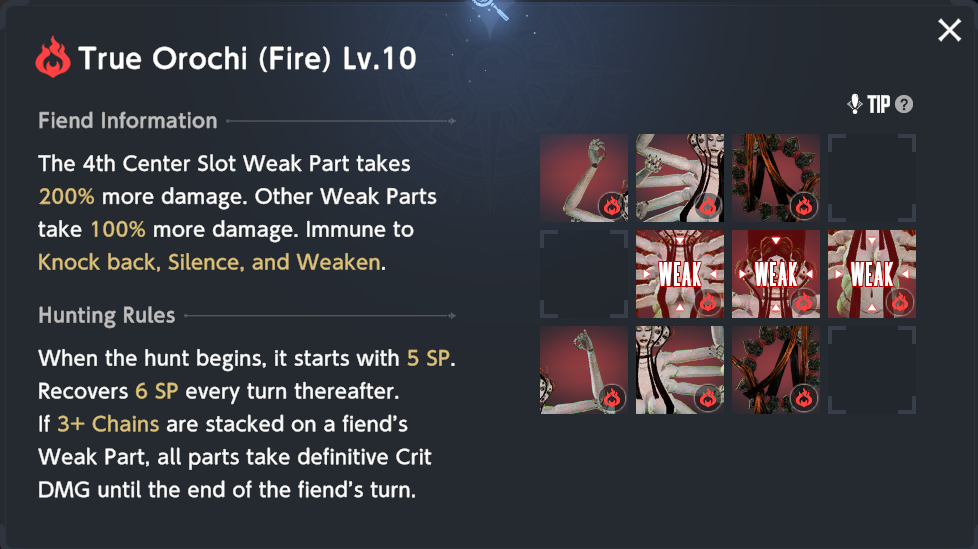
- 0 DEF and MRES, 100 Fire DMG, 50 Wind RES.
- 5 Initial SP, 6 SP gained per turn.
- Skill Sequence: S1 → C1 → C2 → S2 → S3 → S4.
- Stack buffs on your DPS units by having them tank C1, C2, and S2. Have them dodge S3.
- Bring MRES Gear.
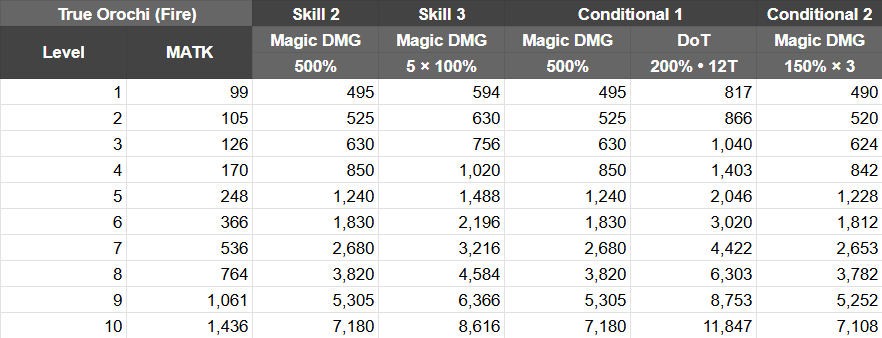
Skill Rundown
Heavy Despair
As a seasoned adventurer with countless battles under my belt, I must say that this Yoma Power Fiend is a formidable foe indeed! The key to success lies in understanding its abilities and exploiting them to our advantage.
Make sure you don’t activate C1 or C2 prematurely. It’s best to use the skill initially so that it expires before the Fiend’s buffs accumulate on your team members.
Shed Skin

Trigger: Have any stat buff on any of your characters.
It’s best to activate this skill after S1 for quicker removal of the monster’s damage reduction during combat. Allow your water-based attack units to sustain the hit first, so they can benefit from abilities C2 and S2.
Devour Pain
Trigger: Stack 7 chains on any tile.
Have your water units take this hit for the buff!
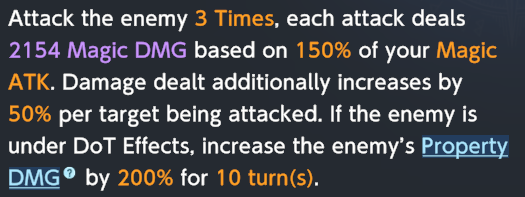
Crushing Yoma Power
Let your Defense Personnel Squad absorb this blow too. Given that all Fiend enhancements are now combined, unleash an attack on the Fiend until you reach S4!
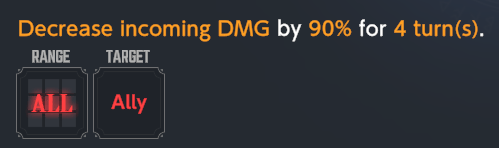
Surging Yoma Power

Have your DPS units dodge this skill, or they will get their buffs dispelled.
Rivers of Blood
After a team switch, the next group steps up while the Fiend returns to Stage 1 and resets its conditional abilities.
Hunting the Fiend
S1 → C1 → C2 → S2 → S3 → S4
Simply allow S1 to be cast at the start of the battle, then trigger C1 and C2.
In this scenario, make your DPS units absorb the attacks from C1, C2, and S2 monsters to accumulate the Fiend’s buffs. Ensure they evade the dispelling effect of S3. The opportunity for dealing damage (nuke turns) comes after the S2 and S3 monsters have acted.
DPS Review


This Fiend Hunt appears tailored for Yumi, as her abilities excel in extended battles. By the end of the fight, Yumi’s Damage Over Time (DoT) will accumulate to a maximum of 30 stacks.
In simpler terms, during a Hunt, Morpeah may face difficulties due to her summons not inheriting any bonuses or penalties from her. Consequently, she can only prepare two sets of fully boosted persona pairs for the attack round.
Schera’s abilities are quite potent, particularly against Lapis Witch, as she exploits its weaknesses. However, Yumi significantly outperforms Schera due to her stackable damage over time effects, which escalate more rapidly.
For this Fiend, Roxy’s Area of Effect ability is the top choice, but it becomes a significant disadvantage when the Fiend unleashes two consecutive high-damage turns because Roxy temporarily reduces her damage output during these downtimes.
At the current moment, Sylvia stands as the sole physical choice. By utilizing her counter-attacks effectively against the Fiend’s S3 ability, which delivers five hits in total, she is expected to perform well and prove a reliable pick.
Read More
- Apothecary Diaries Ch.81: Maomao vs Shenmei!
- Gold Rate Forecast
- Batman and Deadpool Unite: Epic DC/Marvel Crossover One-Shots Coming Soon!
- Who was Peter Kwong? Learn as Big Trouble in Little China and The Golden Child Actor Dies at 73
- Mobile MOBA Games Ranked 2025 – Options After the MLBB Ban
- Hunter Schafer Rumored to Play Princess Zelda in Live-Action Zelda Movie
- 30 Best Couple/Wife Swap Movies You Need to See
- Netflix’s ‘You’ Season 5 Release Update Has Fans Worried
- Gachiakuta Chapter 139: Rudo And Enjin Team Up Against Mymo—Recap, Release Date, Where To Read And More
- Summer Game Fest 2025 schedule and streams: all event start times
2024-10-21 20:37