Key Points
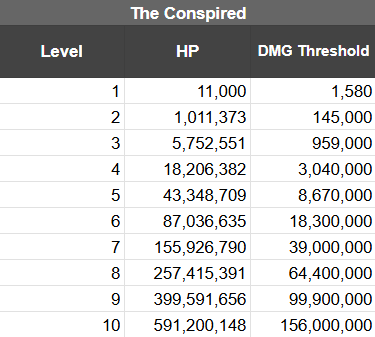
- Level 10 DMG Threshold — 156M.
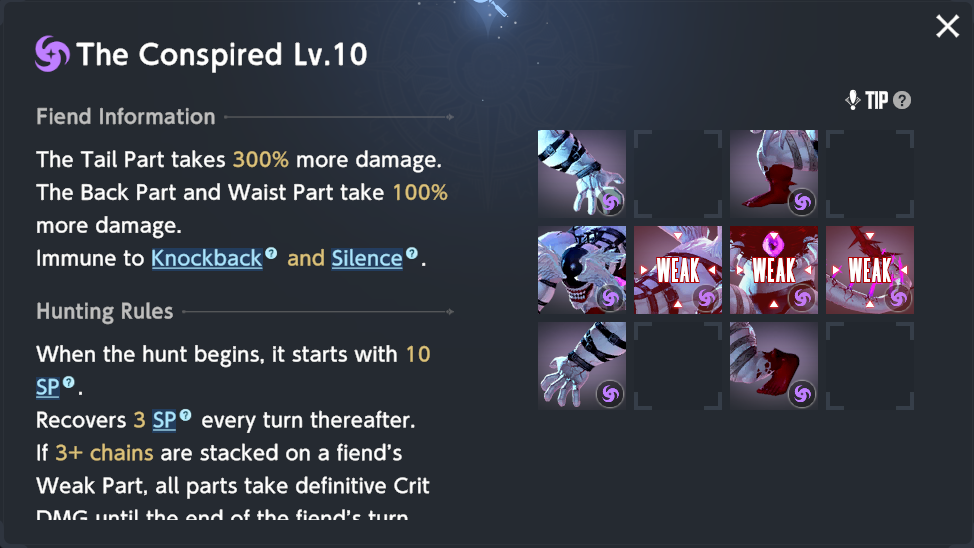
- 0 DEF & MRES, 0 Dark DMG & Light RES.
- 10 Initial SP, 3 SP gained per turn.
- Bring MRES Gear.
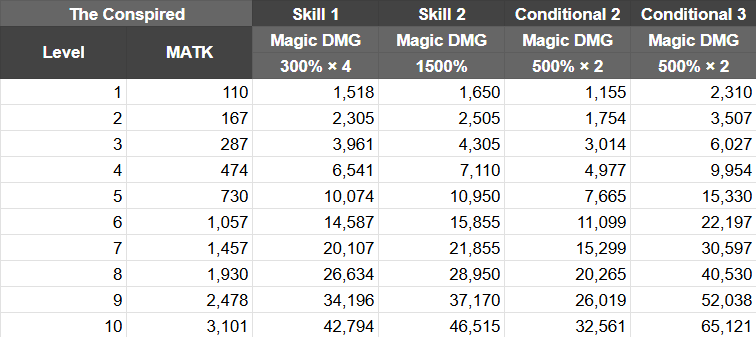
*Conditional Skill 3 inflicts 100% vulnerability, which is included in this table’s calculations.
Skill Rundown
Reunion with the Night

Trigger: Any ally uses a concentrated fire skill
Employing Zenith or Rigenette during this Chase significantly reduces the Fiend‘s damage intake. Avoid using them!
Rippling Darkness


Trigger: Any ally receives healing
Activating any healing ability could lead to a dangerous backlash, primarily affecting your allies more severely as the level increases. To endure such an attack, it’s advisable to either provide an ally with adequate damage mitigation or deploy an energy shield.
Roar of Sorrow


Trigger: Any ally is Augmented.
Enhancements, or boosts, are precisely those that amplify the damage you inflict, specifically. Buffs like M/ATK enhancements, property damage boosts, and Critical Damage Multiplier boosts are not included in this category.
Activating this skill should result in the majority of fragile targets being instantly wiped out if they’re struck, unless they have protective shields or buffs to reduce incoming damage.
Thorns of the Task

Abyssal Gaze


Pouring Malevolence
After a team clean-up, another team steps up while the character called Fiend returns to Stage 1, reactivating its abilities based on certain conditions.
Hunting the Fiend
S1 → S2 → S3 (trigger C2 or C3 if you need extra time)
The Fiend does not provide any boosts or benefits, and every skill it has that requires specific conditions to activate will result in unfavorable outcomes. Here’s a list of its abilities with their corresponding triggers:
1. When the Fiend takes damage, it activates its defensive countermeasure (Retaliate).
2. If the Fiend is attacked by multiple enemies simultaneously, it uses its area-of-effect attack (Multi-Strike).
3. In case the Fiend’s health drops below a certain threshold, it summons a horde of minions to aid it in battle (Summon Minions).
4. When the Fiend is cornered or cannot escape from an enemy, it uses its evasive maneuver (Vanish).
5. If the Fiend’s target is weakened or low on health, it will focus its attack on that specific target (Focus Fire).
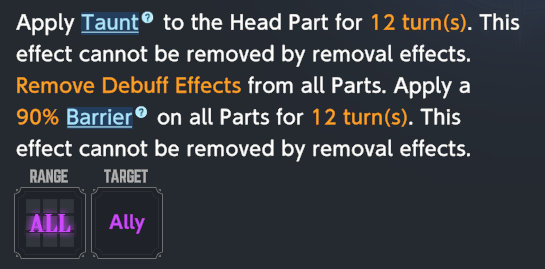
- C1 – Concentrated Fire (Zenith/Rigenette)
- C2 – Healing
- C3 – Augmentation (DMG% buffs)
Avoid activating C1 unless your goal is a single nuclear strike. You can choose to activate C2 or C3 for additional time, but be prepared for severe retaliation in return.
DPS Review


Ventana — Sadly, without access to Zenith, Ventana’s dead in the water.
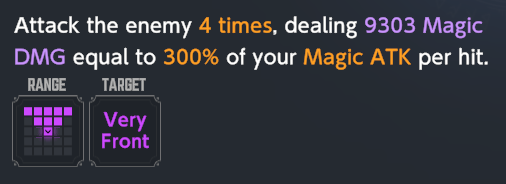
In terms of the physical aspect, Sacred Justia stands out as she can strike up to five targets simultaneously, making her an effective choice.
As a gamer, I find that Yuri’s self-buffs are fantastic, yet I sometimes grapple with the limited reach of her tiles, which can be challenging to maneuver effectively in gameplay.
Angelica (×3 AoE) — The odds are against Angelica, since she can’t use Zenith to access the tail.
In this scenario, Michaela benefits significantly from all the detrimental effects of the Fiend, while the vulnerabilities offer an ideal opportunity for repeated use of Beachside Justice.
Read More
- Gold Rate Forecast
- Tom Cruise Bags Gold: Mission Impossible Star Lands Guinness World Record for Highest Burning Parachute Jumps
- Mobile MOBA Games Ranked 2025 – Options After the MLBB Ban
- Tom Hiddleston and Wife Zawe Ashton Announce Second Pregnancy, Know Couple’s Relationship Timeline
- Are Billie Eilish and Nat Wolff Dating? Duo Flames Romance Rumors With Sizzling Kiss in Italy
- Is Justin Bieber Tired of ‘Transactional Relationship’ with Wife Hailey Bieber? Singer Goes on Another Rant Raising Concerns
- Justin Bieber Tells People to ‘Point at My Flaws’ Going on Another Rant, Raises Alarm With Concerning Behavior
- INCREDIBLES 3 Will Be Directed by ELEMENTAL’s Peter Sohn, Brad Bird Still Involved
- Resident Evil 9: Requiem Announced: Release Date, Trailer, and New Heroine Revealed
- Apothecary Diaries Ch.81: Maomao vs Shenmei!
2025-03-27 12:37