
Quick Links
- Fight Preparation
- Attributes
- Ancestral Grid
-
Boss Fight Mechanics
-
Difficulty
As you leave Montescail City behind and delve into the foreboding stinky swamps, you’ll undoubtedly discover that you’re not the only one there. In the game Dragonkin: The Banished, a variety of unsettling creatures await you, and that’s before encountering the terrifying poison dragon.
After removing several dragon eggs scattered near the lofty trees rising out of the marsh, you will come across Jailanung.
Even though this might be your initial significant boss in this epic journey, remember to stay vigilant. Some of these assaults could end your operation in an instant.
In this manual, I’ll go over the threats you should be aware of while confronting Jailanung in the game “Dragonkin: The Banished,” as well as effective strategies for ending this dragon’s existence peacefully.
Fight Preparation

Before entering the arena and encountering the beast, it’s wise to get well-prepared first. There are various methods to maximize your chances of victory.
Attributes
Initially, it’s recommended that you take a look at the attributes of both you and your pet dragon (Wyrmling) on your character screen. For those using a computer, simply press the ‘G’ key and navigate to tabs labeled as 3 and 6 for more details.
It’s best if your stats are rounded up to the nearest multiple of ten, because once you surpass the 10-stat mark, you’ll unlock a number of passive abilities.
The trees are as follows:
- Courage: Bonus Max HP and Life Drain
- Intellect: Thorn Damage and Armour
- Resilience: Max HP and Attack
- Agility: Armour and Attack
Initially, I allocated all of my initial 10 points towards Courage, since the benefits from this tree provided me with three distinct passive abilities that amplified my base damage.
In the same vein, your Wyrmling possesses four distinct tree options as well, where you can allocate accumulated skill points to reach a total.
Keep in mind that unlike your character, your pet doesn’t have the ability to perish as you do. Therefore, make sure to choose carefully.
Ancestral Grid
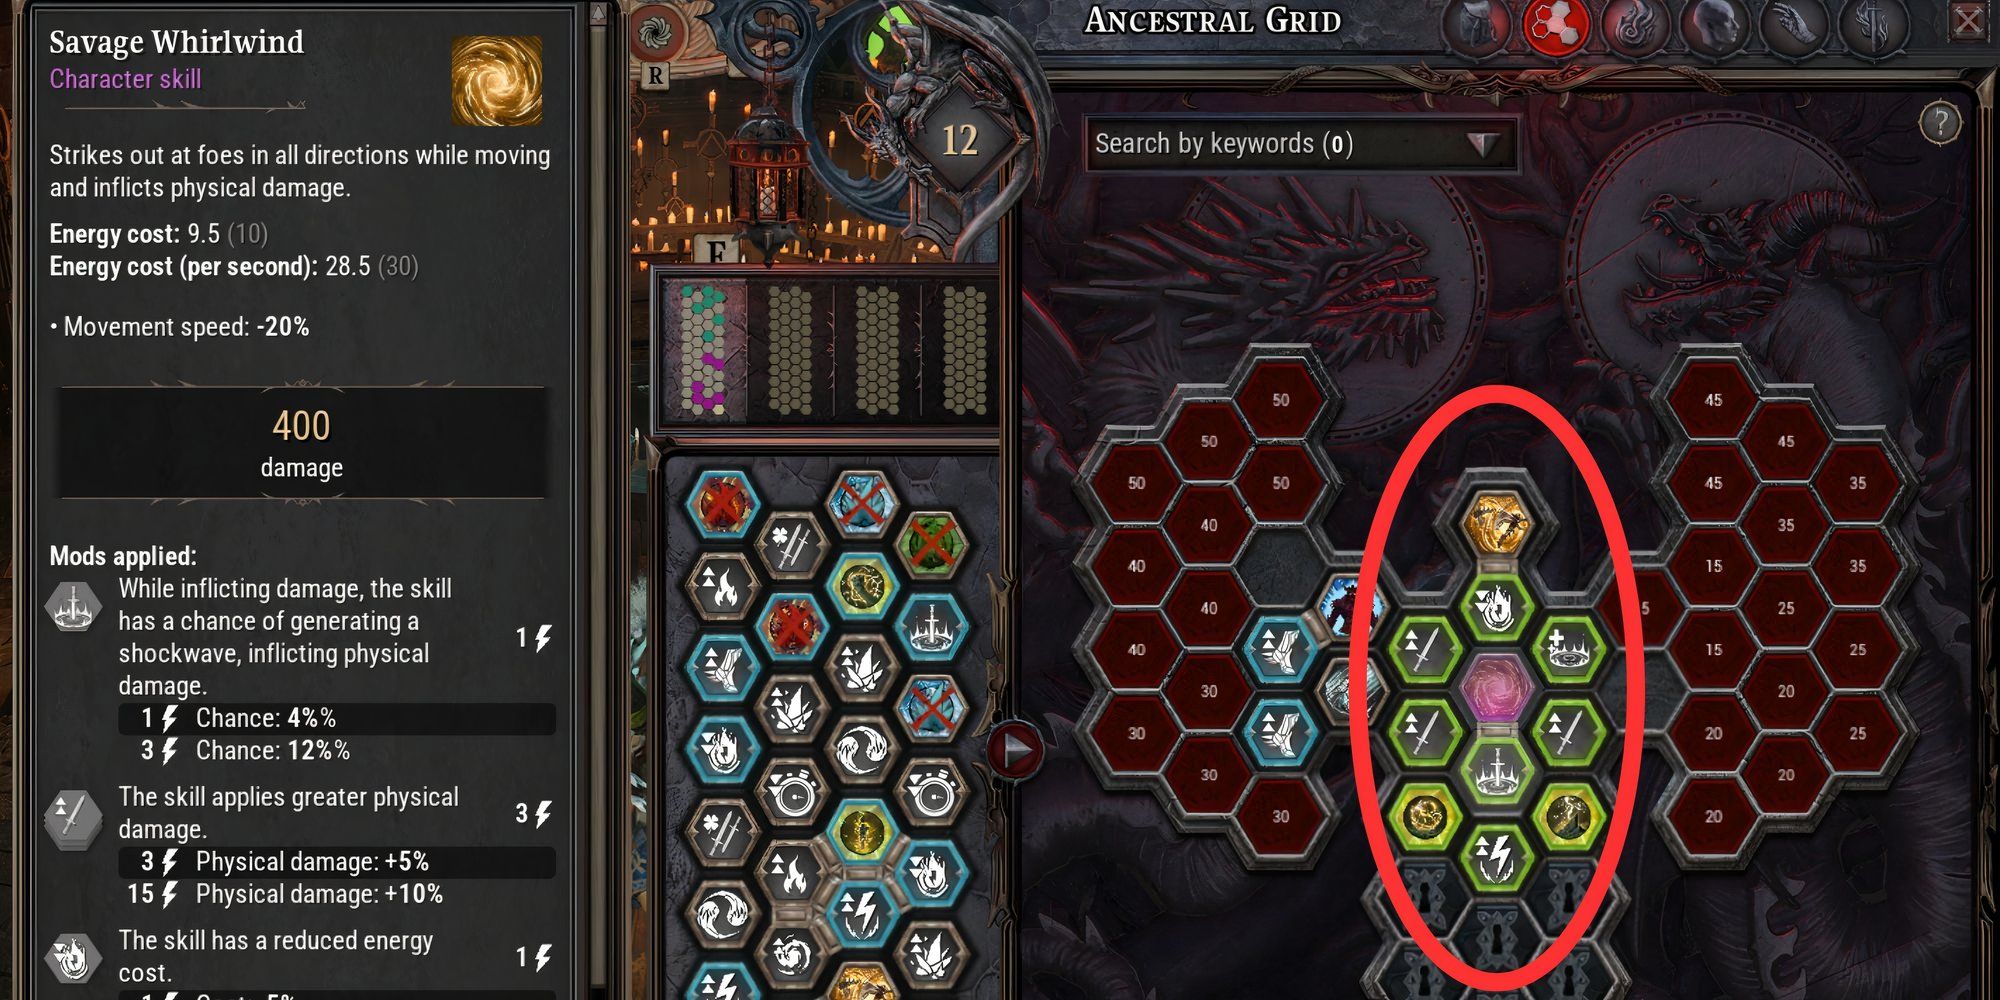
According to the Ancestral Grid, it’s beneficial for you to strive for Symbiosis in any manner you can. Keep an eye on the elemental damage your Wyrmling inflicts, and then search for 8 Hex Fragment modifiers that enhance your primary attacking skill as much as possible.
Organize the pieces in such a way that they interact with the Character’s Skill. If placed correctly, the skill should illuminate, and your components will transform green. Unfortunately, I wasn’t aware of this during the battle, so I find myself at a disadvantage compared to you.
There’s no need to remove all your hex pieces from the board and try to reorganize them. Various configurations might lead to additional harm or special perks instead.
If feasible, strive to acquire a skill that boosts your energy levels during fights, such as the Steel Sweep ability of the Barbarian. This skill enabled me to launch additional attacks when my energy was running low in the heat of combat.
Boss Fight Mechanics

One advantage of this battle is that it occurs in an expansive stadium, providing ample room for maneuverability and dodging enemy assaults.
In numerous Action Role-Playing Games (ARPGs), players often struggle to find clear ground during boss battles due to the frequent use of traps or obstacles. However, this particular game is different in that respect.
Or:
In many ARPGs, they tend to litter the battlefield with traps and obstacles during boss fights, making it challenging to find open space. But this game stands out as it doesn’t follow that pattern.
It’s worth mentioning that there appears to be a potential oversight in the game design: Standing at the edge of the arena leaves Jailanung relatively powerless.
Standing at the arena’s edge restricts Jailanung’s abilities significantly. This could indicate an unintentional flaw in its development.
If you’re feeling drained or lacking in vitality, take a step back and let time pass, allowing yourself to recover, or pause and strategize your next action.
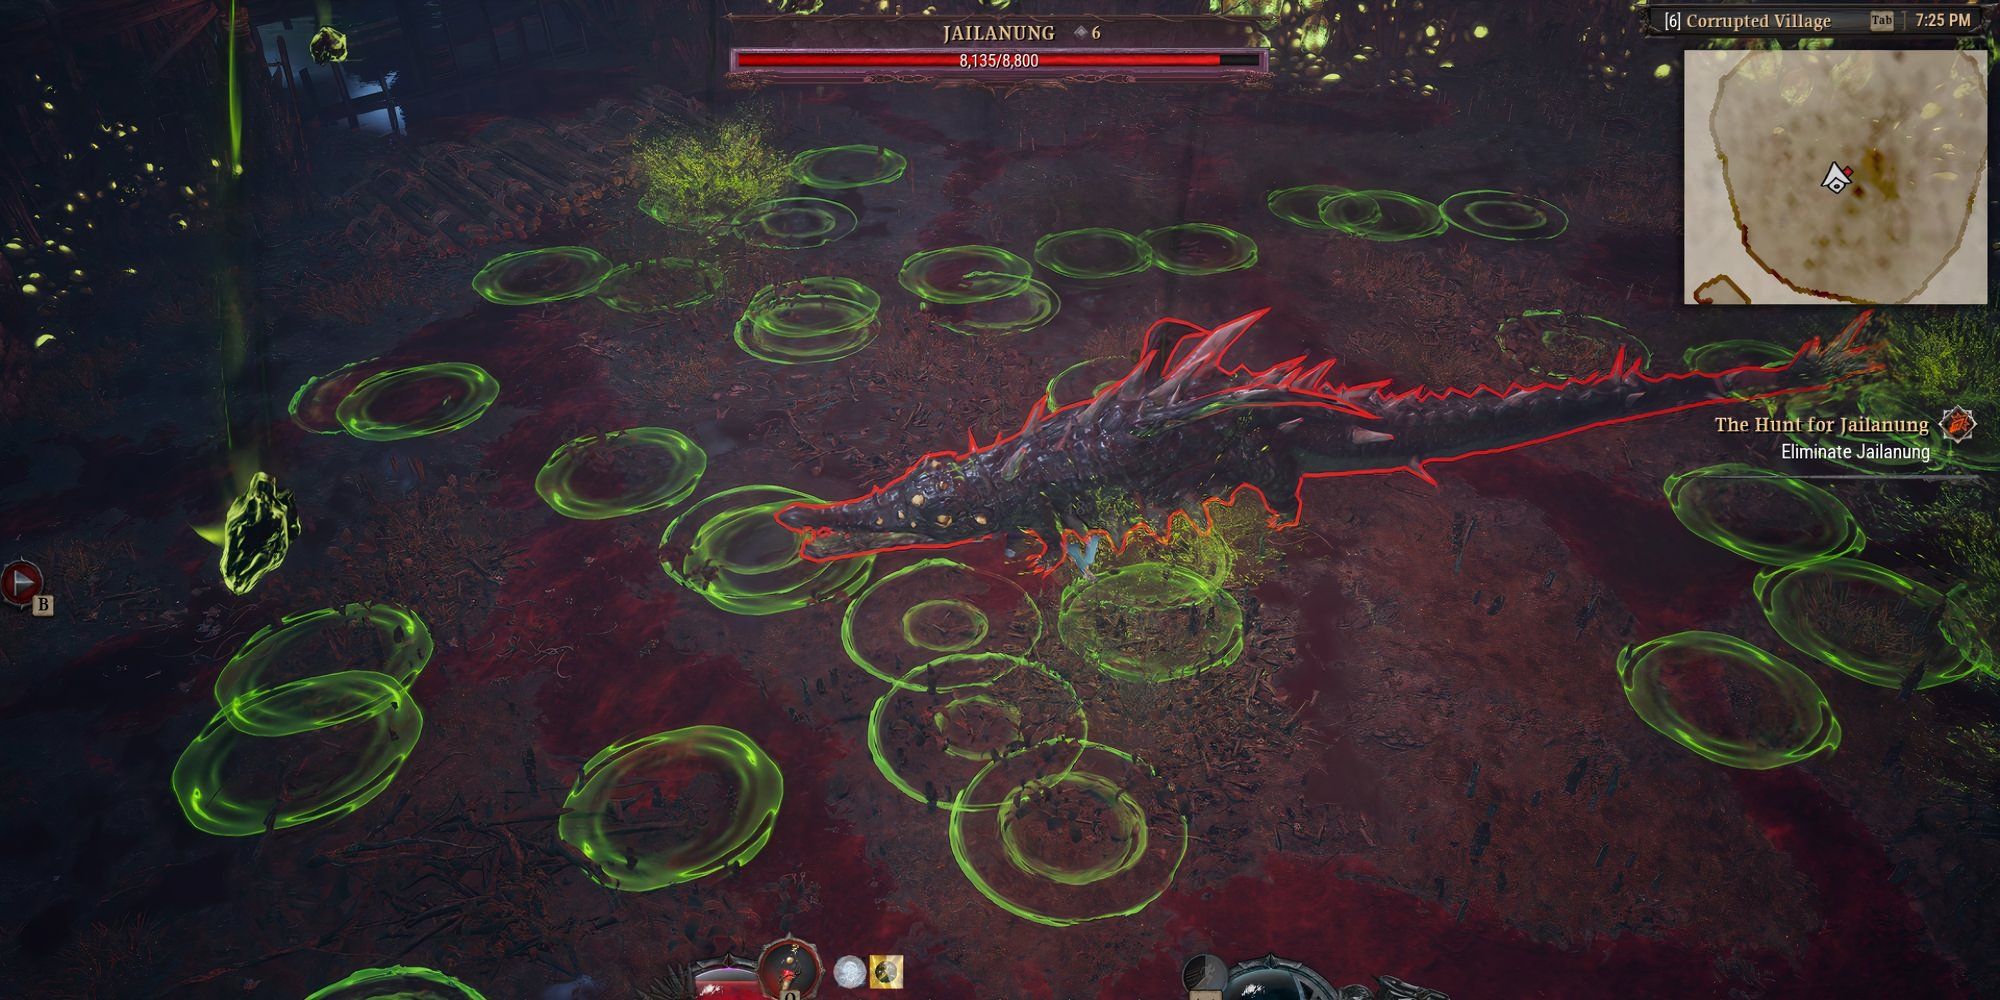
| Attack Name | Description | How To Avoid |
|---|---|---|
| Ground Slam | You will see a large green ring spread out from beneath Jailanung, and then he will stomp the ground and cause a huge shockwave. | Try and dash away as soon as you see this green ring. It gives you a good amount of time. |
| Acid Bath | Occasionally, bubbles of poison will appear in a close ring around him as a sort of defensive shield. Standing still in this pool will quickly deplete your health points. | This can happen after the Ground Slam so don’t run back in too quickly unless you know the coast is clear. Cycle back to avoid this damage, similar to the previous. |
| Poison Projectiles | A floating orb can spawn which shoots out poison in 4 directions. These directions are fixed. More orbs can spawn the lower HP he is on. | Try and get the orbs to overlap with each other so they aren’t as difficult to deal with. The orbs will create 4 quadrants of safety that you can stand in if you don’t feel like running away. These orbs can be destroyed, but be careful as you may take big damage when doing so. |
| Acid Rain | First, Jailanung will crawl around in a circle and then large green circles will appear on the ground. Within moments, huge poison blobs will fall into the green circles, leaving acid pools in their wake. | Simply avoid the green rings on the ground, even if it means that you can’t reach the boss. It’s better to be alive and wait for an opportunity to strike. |
| Toxic Breath | This is one of the scariest ones to look out for, and one that killed me for the first time. The dragon will rear up and spit out green poison in a straight line. If you’re caught unawares, this can easily kill you in one shot. | Quickly dodge to the side if you see Jailanung prepare this attack. Sometimes he will rotate slowly while shooting out poison, so circle him and prioritize your HP. |
Difficulty
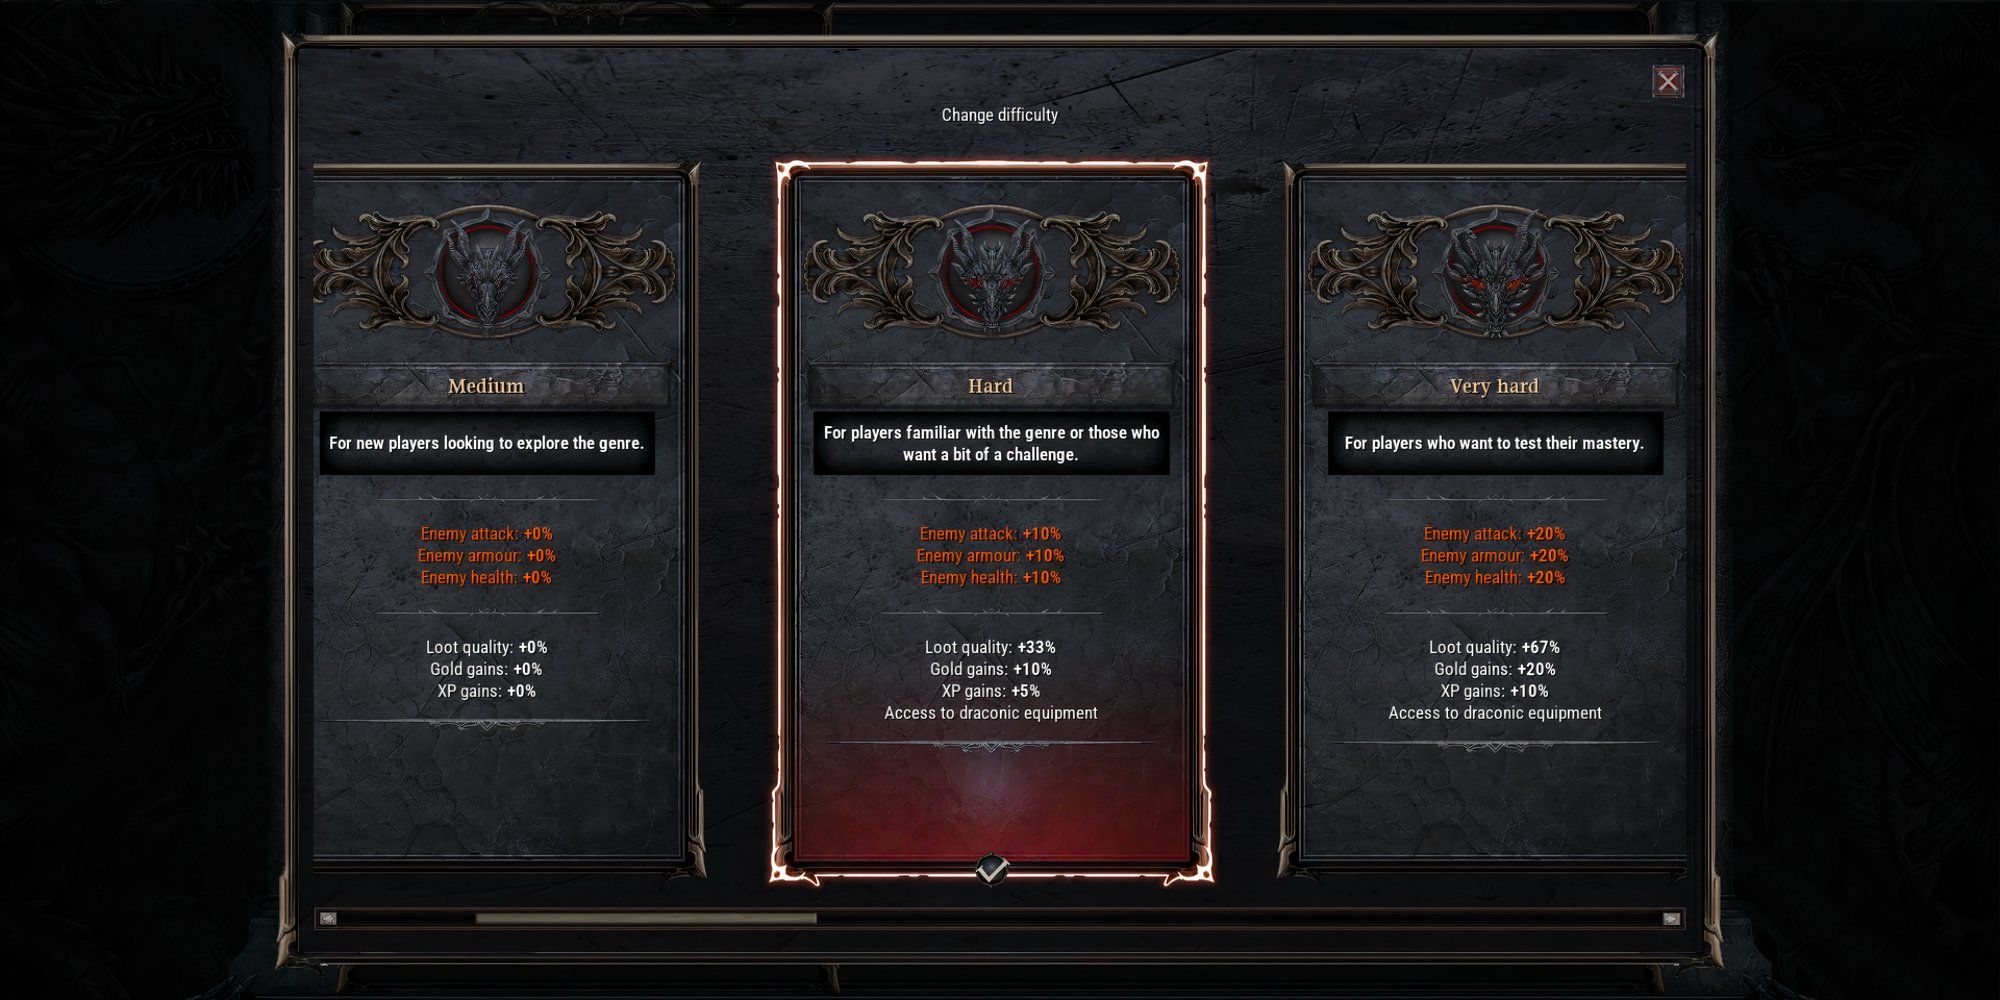
Instead of stating the obvious, remember to avoid dying excessively since every death results in losing some health points.
If you significantly deplete your overall Health Points (HP), you may have to retreat to the city to replenish them. Fortunately, the loss isn’t excessive at this time.
Pay close attention to perfecting your evasive maneuvers, focus on maintaining proper distance, and with practice, you’ll likely minimize the damage received significantly during this battle.
In this action game, you might find that fighting as a ranged character is slightly more manageable than melee combat, given that Jailanung’s defense is primarily focused on close quarters.
Absolutely, should you find the challenge too steep, you’re more than welcome to lower the settings by heading back to The Order’s base in Montescail City whenever you wish.
1. Search for the White Knight icon on your map. (You can boost this again when you’ve gained more battle experience or have a better sense of combat.)
2. Keep an eye out for the White Knight marker on your map. (Feel free to reactivate this command once you’re comfortable with the fighting or after you’ve had more practice.)
3. Locate the White Knight emblem on your map. (You can switch this back on when you’re ready, perhaps after gaining some combat expertise or familiarity.)
Following an assessment of its skills and several tries, you’ll find that defeating this weakened green lizard won’t pose much trouble for you, allowing the narrative to continue smoothly.
Read More
- Apothecary Diaries Ch.81: Maomao vs Shenmei!
- 30 Best Couple/Wife Swap Movies You Need to See
- Netflix’s ‘You’ Season 5 Release Update Has Fans Worried
- Gachiakuta Chapter 139: Rudo And Enjin Team Up Against Mymo—Recap, Release Date, Where To Read And More
- Ncuti Gatwa Exits Doctor Who Amidst Controversy and Ratings Crisis!
- DC: Dark Legion The Bleed & Hypertime Tracker Schedule
- All 6 ‘Final Destination’ Movies in Order
- Every Minecraft update ranked from worst to best
- Zenless Zone Zero 2.0 – release date, events, features, and anniversary rewards
- Summoners War Tier List – The Best Monsters to Recruit in 2025
2025-03-06 15:23