Throughout the Monster Hunter series, an increasing number of weapons were incorporated up until Monster Hunter 4, at which point they began to be varied with each new release. In Monster Hunter Wilds, the same 14 weapons from the last few entries can be found, albeit with significant alterations to suit the game’s unique aesthetic.
In the game series, the Charge Blade has been recognized as one of the most intricate weapons, and this remains true in Wilds. However, with practice, any weapon becomes manageable, and the Charge Blade offers an opportunity to inflict massive damage if you can time your attacks perfectly. Moreover, Focus Mode makes it simpler than ever to execute these timed attacks effectively.
For clarity, we are using Xbox button prompts for this guide.
The Charge Blade
The Charge Blade functions as a hybrid weapon, requiring you to switch between Sword and Shield, and Axe modes. It’s crucial to grasp the fundamentals of each form before using this weapon effectively. While no mode operates independently, they each offer distinct benefits. Let’s delve into those advantages.
Phials
As a gamer, I’ve found that the heart and soul of the Charge Blade are these things called Phials. They might seem a bit tricky to grasp at first, but here’s the lowdown: Swinging my Sword builds up Phial Energy, which I can then store within my weapon. You can see these energy reserves in the corner of my screen.
This is a staged process, which goes as follows:
- Empty – There is no colour on your weapon and no energy to stock.
- Yellow Energy – Your sword will begin glowing orange-yellow, and this energy can be stocked to fill three phials.
- Red Energy – Your sword will glow red, and this energy can be stocked to fill all five phials.
- Overcharged – Your Sword will glow an incredibly bright red and all your attacks will bounce off the monster. This energy can be stocked the same as Red Energy for five phials.
Understanding the basics of using the Charge Blade is crucial because building up too much energy without releasing it can make all your attacks fail to inflict damage as they’ll just bounce back. Releasing this excess energy is straightforward; you simply press RT and B simultaneously, or press B while blocking, which transfers the energy from your sword into the phials.
Phials themselves have two stages of being filled as well, which are:
- Filled – Once a phial is filled, it can be used for Elemental Discharge. The more phials filled, the more elemental attacks you can do.
- Overfilled – After all five phials are filled, they can be filled again so that elemental attacks deal more damage and leave aftershocks.
Combining vials that are either completely full or overflowing is possible, but for uniformity in your damage, it’s advisable to utilize them only when they’re at their maximum capacity (either full or overflowing).
Essentially, keep striking with your sword to accumulate red energy, store it in the vials, and continue this process.
Sword And Shield Mode
In the role of Charge Blade, you’ll find yourself switching between two distinct modes. The primary one is the Sword-Shield Mode, which, while having fewer overall attack options than a typical Sword-Shield combo, boasts an enhanced arsenal of charged attacks. This mode also provides significant agility and defensive capabilities, allowing for swift movement and the ability to deflect incoming attacks. The Axe mode, on the other hand, offers a different set of advantages, but it’s not as versatile or mobile as Sword-Shield Mode.
In Sword mode, while the damage output might be somewhat limited, it’s still not negligible. Its major strength lies in the increased mobility and agility it provides, as well as the seamless transition between various moves. These moves are swift and can often be combined effortlessly. For instance, a Shield Thrust could lead to a Fade Slash, then a Charged Rising Slash, followed by another Shield Thrust. Despite its relatively low damage output, it offers a significant amount of freedom in combat.
It is also the only way to charge phials.
Axe Mode
At the other extreme of the Charge Blade, there’s Axe Mode. This mode is incredibly sluggish but delivers an enormous boost in damage. Unfortunately, it doesn’t provide any means of defense against incoming attacks. However, it does come with a substantial amount of hyper armor during your attacks, offering some level of protection.
Instead of using Axe Mode when neither it’s powered up, not filled with phials, nor set to Power Axe Mode, it’s best to avoid using it until it has been enhanced.
As a fan, I’ve found a clever trick to switch from Sword and Shield Mode to Axe Mode. By default, you can only activate Axe Mode through specific attacks. To execute this transition smoothly, you can either block an incoming attack and press ‘Y’, or perform a Shield Trust or guard an attack, followed by pressing ‘Y+B’. Be mindful when employing the latter option, as it triggers an Amped Elemental Discharge automatically in such cases.
Powered-Up Mode
Instead of being called the Switchaxe, the weapon is named Charge Blade for a specific reason. In Axe Mode, you can charge phials to enhance your elemental strikes, but these energy reserves serve another purpose too – they can be utilized to amplify the power of both the sword and shield individually. These weapons have multiple methods to upgrade, but the fundamental process involves channeling your energy into them rather than hoarding it.
Instead of transferring Sword Energy into phials as usual, maintain holding the B button to fortify your shield instead of storing it. Once your shield is empowered, you can then perform the same action for the Sword. After initiating the transfer of Sword Energy, press Y instead to initiate a concentrated elemental strike. Time the release of this correctly and it will amplify your sword.
No need to fret! The Condensed Elemental Slash doesn’t necessarily have to strike an adversary in order to boost the weapon’s power. In case the attack is overcharged or undercharged, the excess energy goes into your phials instead.
The axe functions uniquely, with just two distinct methods to activate it: either by executing a flawless block followed by pressing ‘Y’ for an intense Axe Cleave, or by exploiting the Double Strike on a vulnerable spot.
Here is what each weapon can do when powered-up:
- Sword – Attacks will not deflect no matter your sharpness, except when overcharged with Sword Energy, and will deal more damage overall.
- Shield – You can block more powerful attacks with staggering or taking damage, and allows Axe mode to use Super Amped Elemental Discharge.
- Axe – The Axe can now hold the attack button to perform multiple hits with a single swing. With overfilled phials, small explosions will also occur after each attack.
The activation process might seem complicated. To activate the Sword, you need to ensure that the Shield has been activated first. On the other hand, you can use the Power Axe without activating any other parts. Once activated, the Sword will stay active even if the Shield loses power. However, it cannot be recharged until the Shield is powered-up again beforehand.
Charge Blade – Skills And Abilities
Once we’ve grasped the basics of operating a Charge Blade, let’s delve into its intricate functions and explore various techniques for seamlessly transitioning between its modes.
Charged Rising Slash
Among the fundamental moves in Sword Mode, the Charged Stab is a frequently used attack. To execute it, simply stand still and press B, then release at the optimal time – similar to the Condensed Elemental Slash technique. The color of your blade and the sound cue during the charging phase make this move easy to identify.
As a devoted admirer, let me express how thrilling it is to witness this move’s might! Yet, what truly sets it apart is its astonishing ability to swiftly amass Sword Energy. With just two well-timed Charged Rising Slashes, you can unleash Red Sword Energy, and with the right skills, it takes even less time to charge!
If you launch the assault either prematurely or tardily, it results in a less effective move called Charged Slash. This move is not only feeble but also adds very little Sword Energy to your stock.
Elemental Roundslash
The Elemental Roundslash move significantly expedites the process of enhancing the Charge Blade’s power. To execute this move, start an Amped Elemental Discharge, followed by pressing RT to interrupt the discharge and instead perform the Elemental Roundslash. This swift attack transitions you back to Sword Mode while transferring any accumulated Sword Energy and stored Phials into the Shield for charging it up.
This implies that you can activate the shield even as you continue attacking non-stop. An effective technique to master is, once you’ve gathered sufficient Sword Energy, execute a Shield Thrust. This move can be seamlessly chained into an Amped Elemental Discharge, and then swiftly followed by an Elemental Roundslash.
Fade Slash
In Axe Mode, you’ll deal most of your damage, but it’s dished out in quick spurts. Spending much time in Sword Mode is necessary, and since you’ll be vulnerable without some durability, the Fade Slash move becomes very potent. This is what makes Fade Slash so powerful.
Instead of dealing substantial damage, this technique allows for swift maneuvering around monsters when you press B while guiding the left stick in any direction. The distance covered is remarkable, enabling movement from a monster’s face to nearly behind them with just one Fade Slash. This attack can be seamlessly integrated into most combos as well, making it highly effective for evading enemies.
Remember, the number of invincibility frames during Fade Slash is quite limited or non-existent, so be cautious when using it.
Super Amped Elemental Discharge
In Sword Mode, Charged Rising Slash serves as its main move, akin to Super Amped Elemental Discharge in Axe Mode. This is what makes the Charge Blade so visually impressive and capable of inflicting massive damage. However, it does demand an intricate setup process.
As a gamer, when my shield’s powered up, I can pull off the Special Amped Elemental Discharge (SAED) by pressing Y + B. If the shield isn’t active, the most potent move I can unleash is the Amped Elemental Discharge instead. However, with the shield charged, I have the choice to follow up with another attack or go straight for the final blow.
This attack delivers a massive blow for high damage without any phials, leaves behind a trail of explosives when the phials are full, and creates aftershocks when the phials are overfilled. However, it requires some time to execute, making it most effective against monsters that are immobile, whether they’re trapped or stunned.
With Focus Mode, you’ll be able to swiftly adjust your focus, ensuring that you’ll no longer miss any attacks unexpectedly.
Perfect Guard
One significant advantage of using the Charge Blade is its robust defensive capabilities while in Sword Mode. Not only does your shield effectively reduce a considerable amount of incoming damage, but a Perfect Guard enhances this protection even more, ensuring you remain upright and ready for battle.
As a gamer, when I swiftly block an enemy’s attack at the right moment, not only do I dodge the damage completely, but if my Guard skill is high enough, I won’t even be knocked off balance. In the rare instance of a Perfect Guard, there’s a brief window where I can capitalize with some strategic moves!
- Savage Axe Slash – This is an attack that brings you into Power Axe Mode, and can be extended to deal even more damage.
- Super Amped Elemental Discharge – With charged phials and a powered-up shield, you can instantly transition to the final attack of SAED. This is great when the monster is also staggered by the Perfect Guard.
In specific situations, a Perfect Guard can initiate a Power Clash with the monster. To emerge victorious, you need to quickly tap the Y button repeatedly, resulting in a powerful thrust of your sword that causes additional damage.
Double Rend
In this game, the Focus Attack for the Charge Blade can be executed in either Sword or Axe form. It’s quite a reach, allowing you to approach an enemy’s injury from a distance. Upon impact, it switches to Power Axe Mode and continues tearing at the wound. After the attack concludes, your character remains in Power Axe mode.
Additionally, while using Double Rend, you may activate Focus Mode to shift the attack towards different areas of the monster for inflicting damage.
Using this method, you can activate Power Axe mode effortlessly, avoiding the need for a Perfect Guard. This allows you to deal high damage almost instantly.
Charge Blade – Tips And Tricks
After understanding how the Charge Blade functions, you should be able to excel in any hunt. However, achieving mastery over a weapon involves familiarizing yourself with every minute detail, and the Charge Blade has many such details that can transform it into a quicker, more aggressive tool. Here are some examples:
1. The Phial Sabre – This is an essential part of the Charge Blade, used to unleash elemental attacks. Learning its timing and positioning will make your attacks more effective.
2. Adept Slash – This move allows you to charge up a powerful strike while sheathed. Mastering this technique can help you catch opponents off guard.
3. Giga Impact – This is a powerful move that requires building up energy with repeated strikes. Once ready, it deals massive damage but leaves you vulnerable. Understanding when to use this move is crucial.
4. The Sword Mode – Transforming into Sword Mode allows for faster attacks and mobility. Knowing when to switch between Sword and Shield modes effectively can change the tide of a battle.
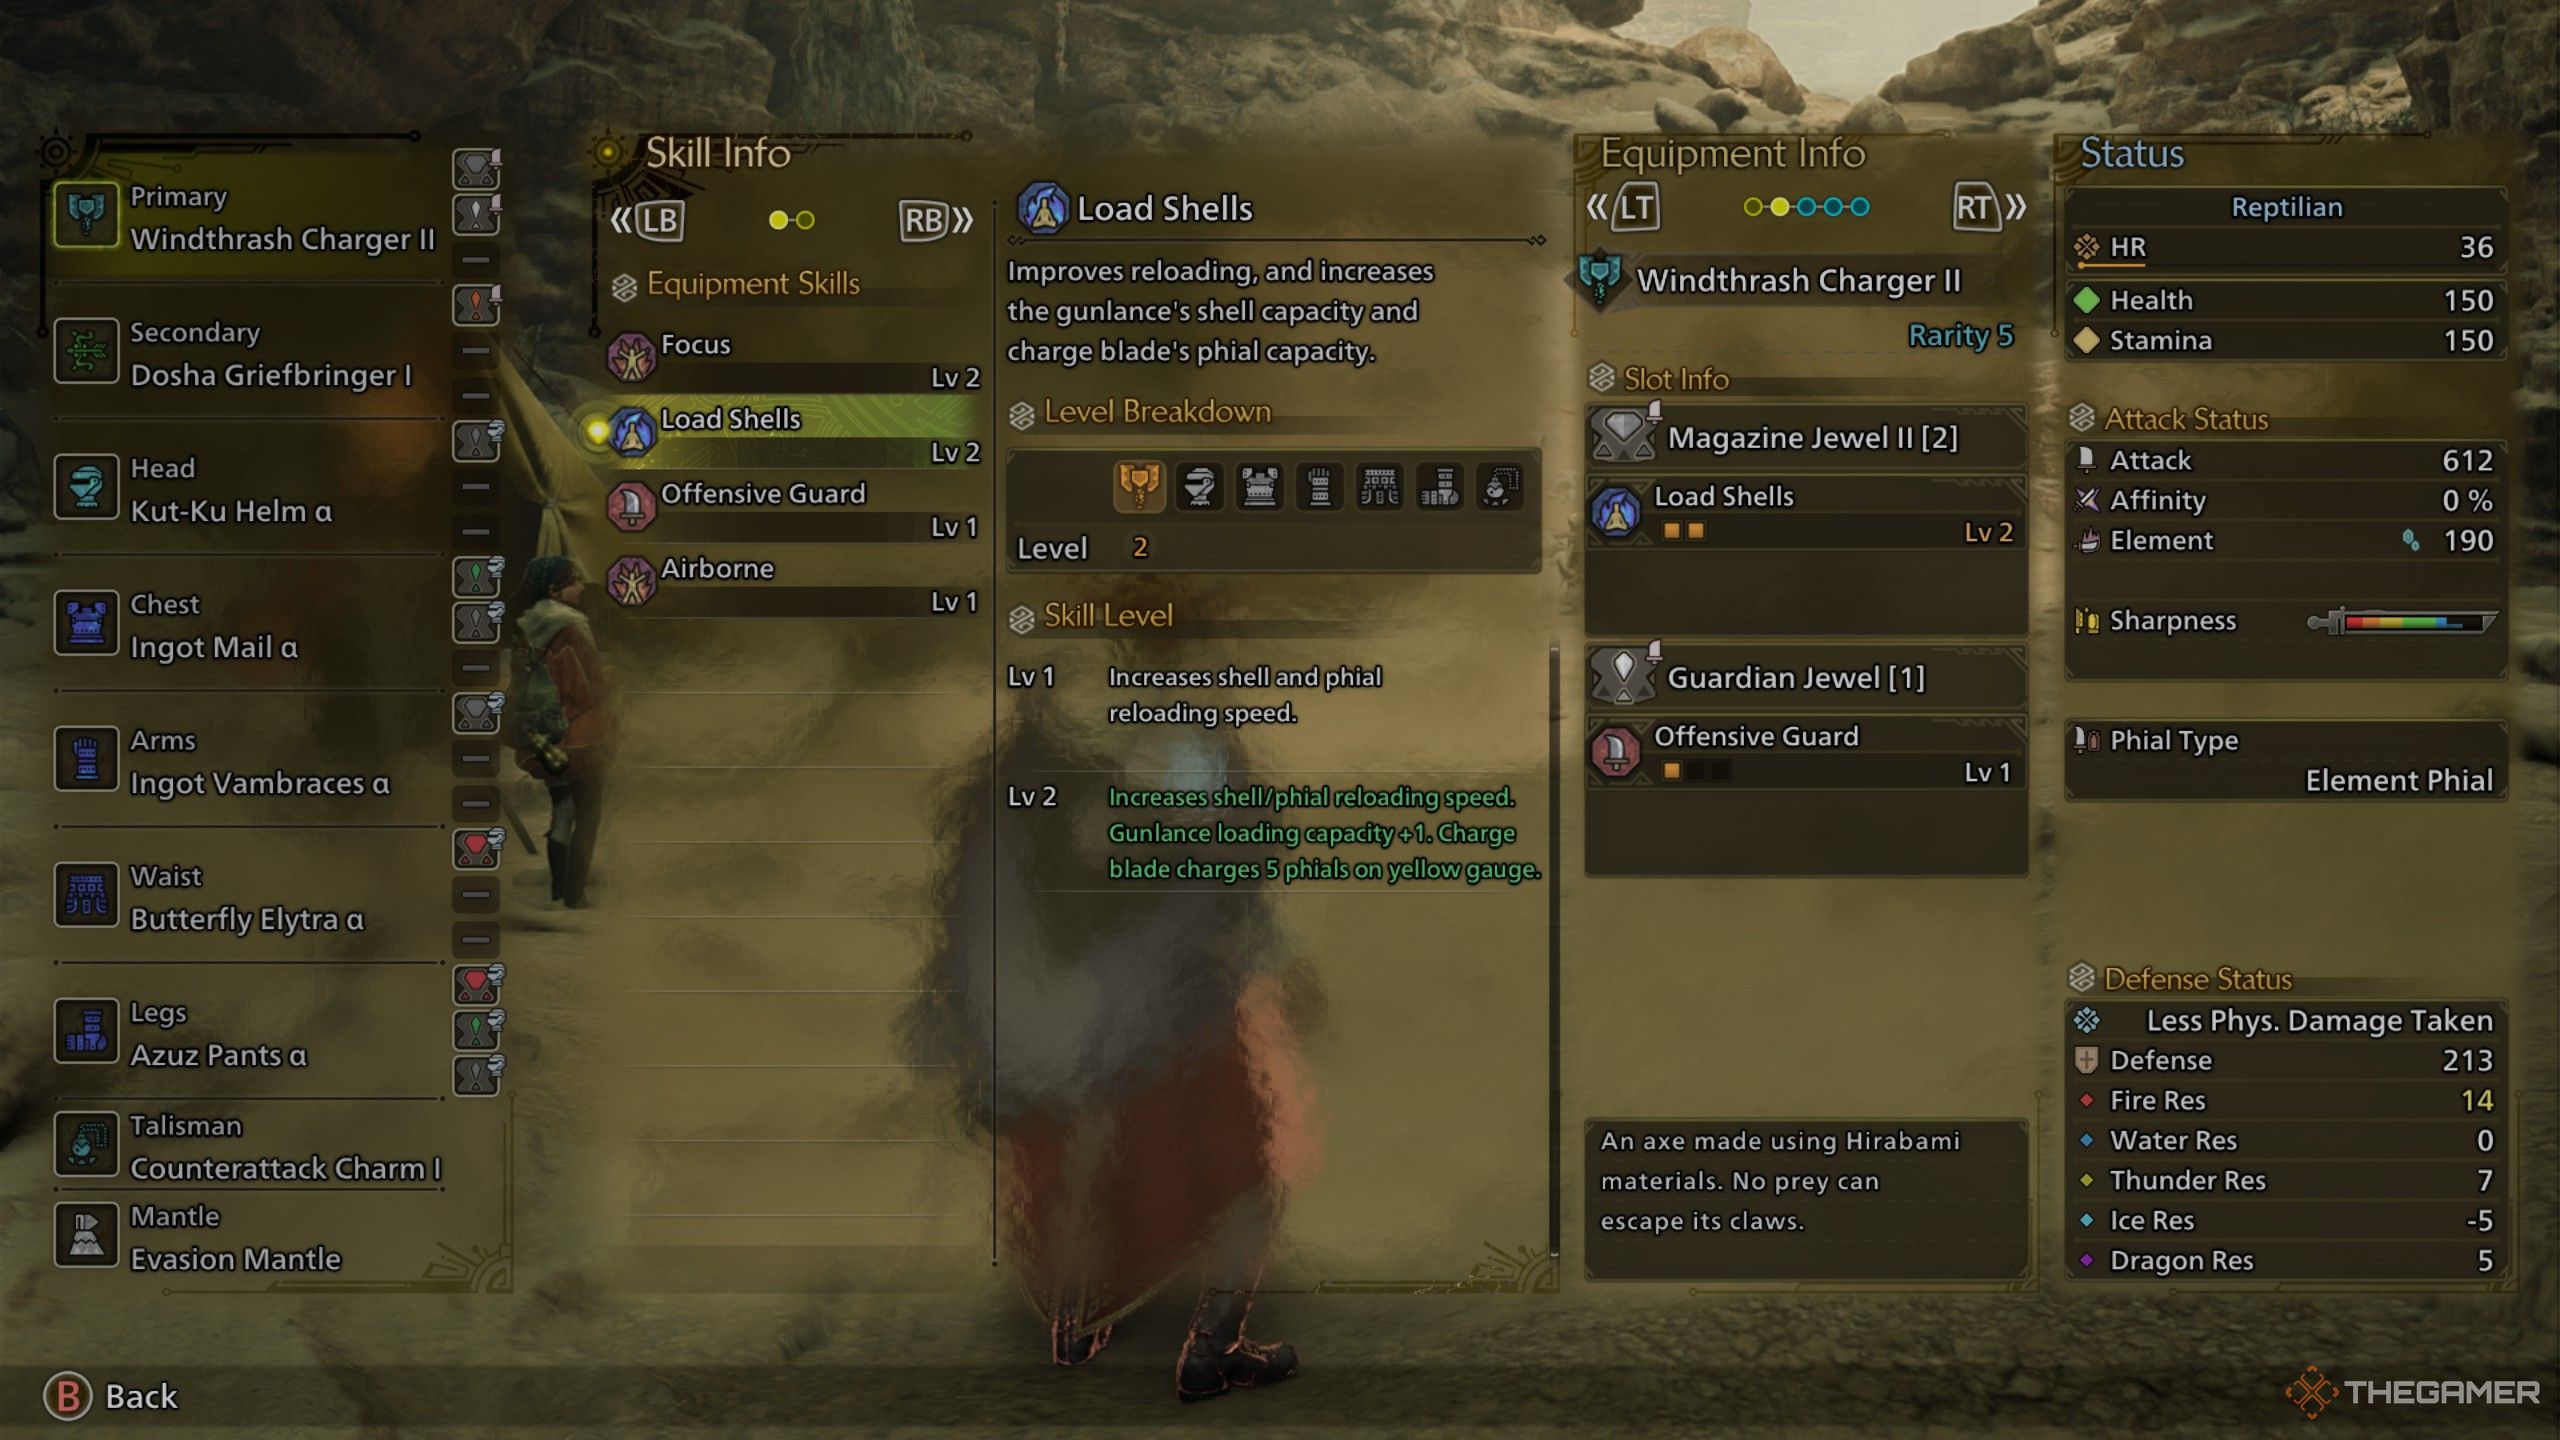
Use The Load Shells Skill
The primary task in handling a Charge Blade is maintaining the balance by filling phials, which can be repeated indefinitely with each SAED. Yet, wouldn’t it be wonderful if you didn’t have to spend as much time collecting? That’s where the Load Shells skill comes into play, offering an efficient solution.
Initially, this ability quickens the rate at which Sword Energy is accumulated, reducing the number of attacks needed to fill up the phials. At the next level, Yellow Energy can now fully load all five phials, while Red Energy will overflow them from an empty state. This significantly boosts combat speed and allows for dealing much greater damage.
Take Advantage Of Guard Points
Weapons like the Charge Blade, which include those with blocking capabilities, possess unique defensive mechanisms called Guard Points. Similar to a regular block, these occur during the weapon’s animation, preventing interruptions while still shielding from all damage. However, mastering these can be extremely challenging.
Essentially, when the Shield is positioned in front of you during abilities like Elemental Boost and timed correctly, it serves as a protective barrier, effectively pausing attacks. Even though they don’t provide a Perfect Guard, they ensure that gameplay remains fluid by offering this useful functionality.
Elemental And Impact Phials Work Differently
When selecting your Charge Blade, you may have observed two categories of flasks – Impact Phials and Elemental Phials. While they are similar in many aspects, their differences become apparent during specific Axe Mode assaults and the SAED.
Impact Phials specialize in momentarily stunning and tiring creatures, while also amplifying the affliction caused by your weapon during each attack that consumes a phial. This rule applies similarly to Elemental Phials, but with the related element taking its place instead.
In summary, the significant distinction lies in the ultimate attack of SAED (Super Aerial Dive). An Impact Phial’s final blow sends waves forward based on the number of stored phials, extending its range. On the other hand, an Elemental Phial’s blast moves to both sides, increasing its width. Adjust your choice according to your playstyle and the monster you’re confronting.
Learn Your Shortcuts
The key difference between a novice and an expert in wielding the Charge Blade lies in mastering its shortcut techniques. While a beginner can inflict significant damage and charge the weapon at a decent pace using basic skills, it’s the shortcuts that transform this weapon into a formidable powerhouse. With these shortcuts, you can effortlessly switch between modes and swiftly charge your weapon, making you a true master of the Charge Blade.
Have all your devices fully charged? To execute the final strike of SAED, simply defend against an attack and then follow up with a swing. Your shield requires more energy to activate. Change to an Elemental Roundslash by cancelling other moves. The Charge Blade offers a wide range of possibilities as many of its moves can be combined with others, making it highly versatile if you learn the right combination strikes.
Read More
2025-02-28 16:38