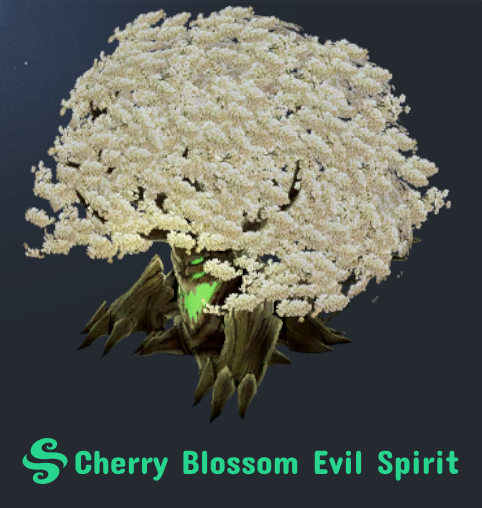
Key Points
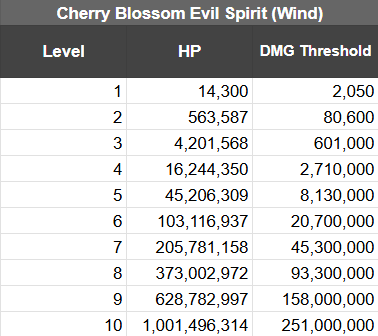
- Level 10 DMG Threshold — 251M.
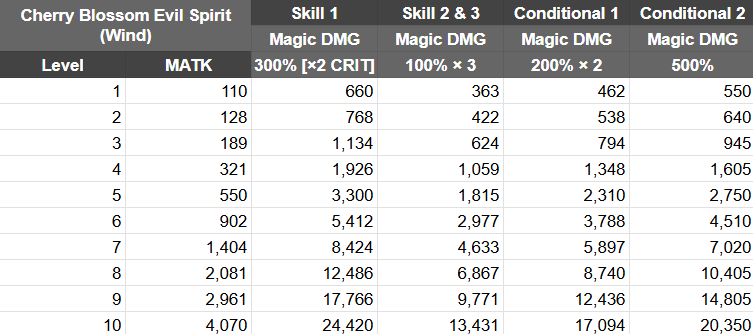
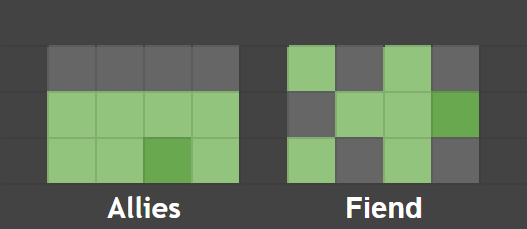
- Fiend Stats — 0 Crit Rate, 100 Crit DMG, 0 DEF & MRES, 100 Wind DMG, 50 Water RES.
- S1 will give the Fiend 100 Crit Rate! Make sure to trigger C2 afterwards.
- Optimal Skill Sequence: S1 → C2 → S2 → C1 → S3 → S4.
- Have your main carry be the main target of S1, S2, and C1 to receive Fiend buffs.
- Bring MRES gear. Your main carry especially needs 90 MRES on top of healing/energy guard to survive the later levels.
Skill Rundown
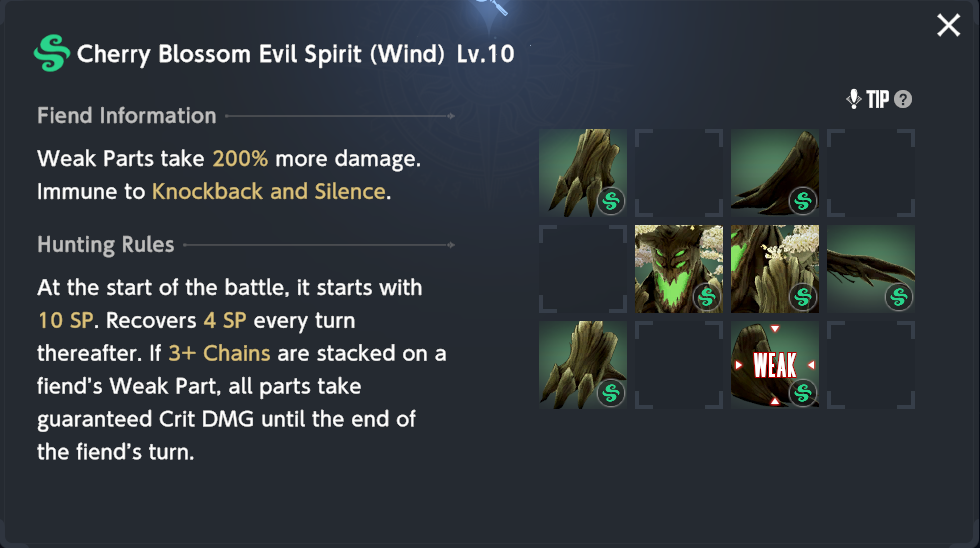
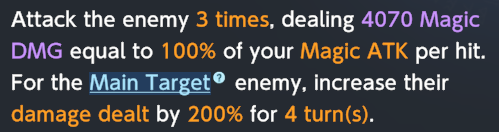
Frenzied Thorn
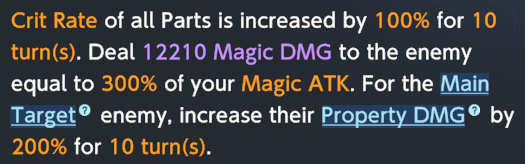
The Fiend’s attack causes twice as much damage (100 Critical Damage) to your team, unless you remove its buffs. Be sure to activate skill C2 after this attack!
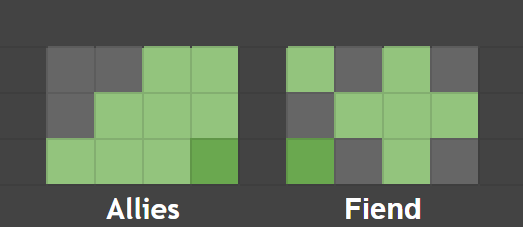
Focus on having your main character positioned within the designated dark green square, as it’s where this ability will amplify their damage output.
Desperate Confession
Trigger: Apply the weaken debuff on any tile.
Remember that a weaken effect is any status reduction debuff, which includes decreases in DEF, MRES, ATK, and MATK. Any shred skill will activate this ability even if the Fiend has zero RES stats.
Trigger this skill after S1 so that the Fiend loses its crit rate buff.
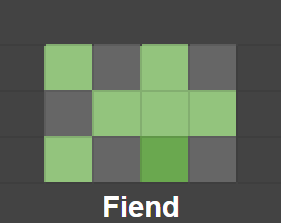
Pressure of Love
Make the main character stand in the dark green square, then give them a damage increase bonus. Activate ability 1 afterwards.
Surging Sincerity
Trigger: Stack at least 10 chains on any tile.
Make sure the primary character is the focus of this ability, giving them an additional boost in damage.
After this, nuke the Fiend!
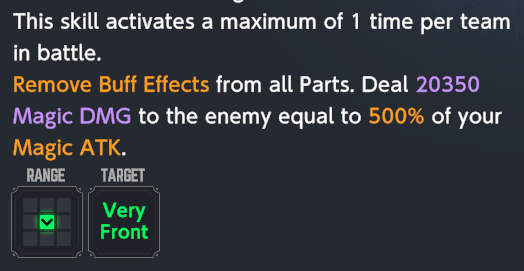
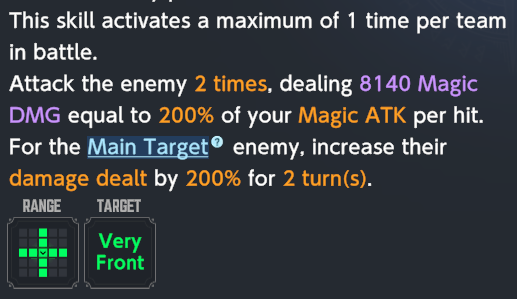
Heart’s Compulsion
You will lose at least 6 SP from this attack, so make sure you have enough SP for one last attack.
Cherry Blossom‘s Passion
A team wipe! Your next team then takes the stage as the Fiend loops back to S1 and refreshes its conditional skills.
Hunting the Fiend
S1 → C2 → S2 → C1 → S3 →S4
Trigger C2 after S1 to remove the Fiend’s crit buff, and have your main carry be the main target of S1, S2, and C1 to stack all of the Fiend’s buffs. They will need to have 90 MRES to take these hits, and they may need extra survivability in the form of either healing or energy guard.
In order to trigger C2, you will need to have some form of weaken in your team. The most natural option is Celia, whose costumes have DEF or MRES shred in her potentials. She can also trigger C1 with her chain stacking. Physical teams can use Rafina, since Code Name A has DEF shred while Game Club can contribute to damage amplification (keep in mind that the Fiend gives plenty of DMG buffs already though, which diminishes the effect of vulnerability debuffs).
Line up your best damage skills for after C1.
DPS Review


Loen (×8 AoE) — Best damage output for magic teams, having a self MATK buff as well.
As a fan, I appreciate Levia’s impressive area-of-effect (AoE) abilities, but I’ve noticed that her vulnerability debuff isn’t as effective when facing off against the Fiend’s damage boosts. If you pair Levia with a heavily invested Loen, it would be wise to make sure that Loen takes the brunt of the Fiend’s attacks instead.
Liatris (×8 AoE) — Best physical carry, nothing more to be said.
Eris (×3 AoE) — The Fiend’s tiles do not favor Eris at all, requiring her to use Zenith just to reach the weak spot.
Read More
- Apothecary Diaries Ch.81: Maomao vs Shenmei!
- Gold Rate Forecast
- Batman and Deadpool Unite: Epic DC/Marvel Crossover One-Shots Coming Soon!
- Who was Peter Kwong? Learn as Big Trouble in Little China and The Golden Child Actor Dies at 73
- Mobile MOBA Games Ranked 2025 – Options After the MLBB Ban
- Hunter Schafer Rumored to Play Princess Zelda in Live-Action Zelda Movie
- 30 Best Couple/Wife Swap Movies You Need to See
- Netflix’s ‘You’ Season 5 Release Update Has Fans Worried
- Gachiakuta Chapter 139: Rudo And Enjin Team Up Against Mymo—Recap, Release Date, Where To Read And More
- Summer Game Fest 2025 schedule and streams: all event start times
2025-03-18 15:11