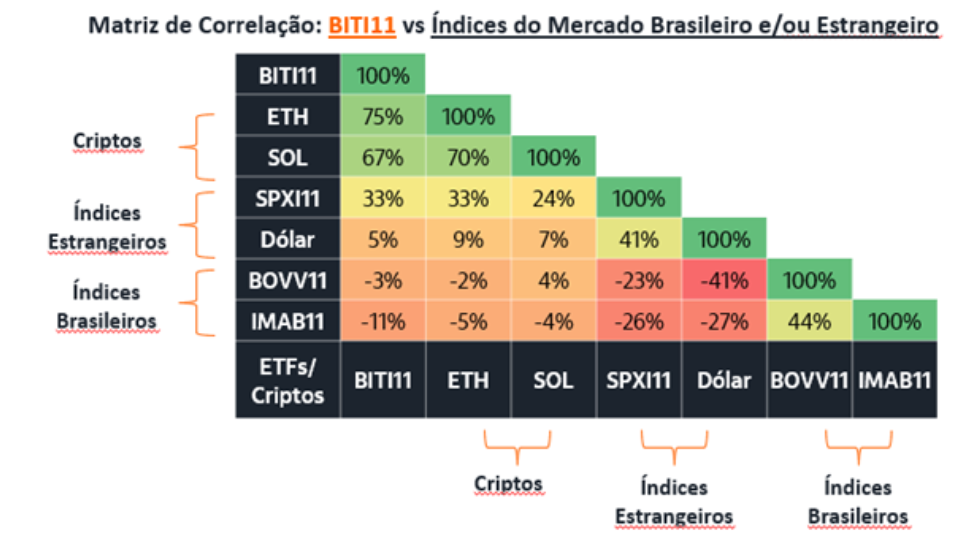
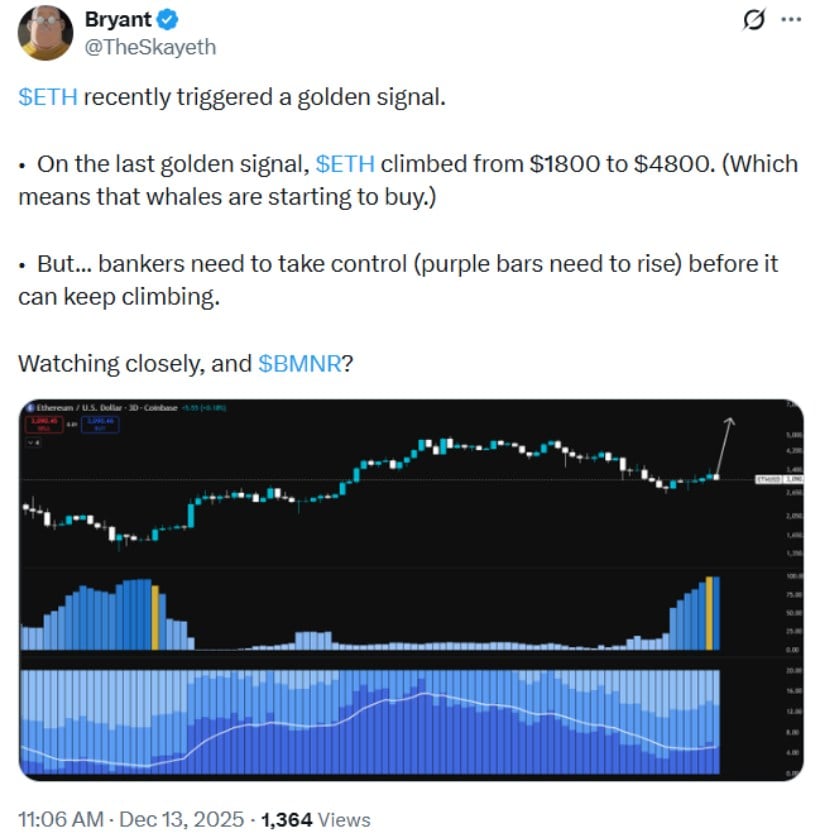
Towards the conclusion of Act 1 in Kingdom Come: Deliverance 2, Henry, Godwin, Hans Capon, and Jan Zizka are apprehended by Otto von Bergow and Istvan Toth. While Hans moves on with Otto von Bergow, the remainder of their group is transported to Trosky where they undergo torture to extract information from them.
In Storm, act one concludes with players needing to evade Trosky and encounter Istvan Toth. This isn’t an easy task since they must sneak past the castle guards or else the entire fortress will be alerted to their escape. Here’s a comprehensive guide on how to navigate through Storm in KCD2.
Storm Walkthrough in Kingdom Come: Deliverance 2
At the outset of the adventure, Henry endures a brutal interrogation by Istvan Toth, who demands information. Players will have opportunities to employ deception or intimidation via skill checks. However, it’s Godwin who eventually discloses the vital details to save Henry, regardless of his words. But when all seems lost for the group, Katherine miraculously shows up and provides them with assistance.
Escape the Dungeon
Following their liberation, Henry along with his companions deliberate on their subsequent actions. Their objectives are threefold: retrieving their gear, eliminating Istvan, and locating the instructions that detail von Bergow’s strategies. To minimize suspicion, Henry plans to proceed solo for the collection of all necessities. Meanwhile, Katherine offers her dagger to Henry, allowing him to perform a stealthy kill if he encounters any guards who cannot be evaded during his mission.
I snatched the weapons from the slain guard that Katherine had felled, gearing up for my impending showdown with Istvan Toth. The sword and armor felt heavy yet reassuring in my hands, instilling a sense of determination within me as I prepared to face my adversary head-on.
First, make your way to Istvan’s quarters located within the Witch’s Tower (Crone’s Tower) to retrieve your belongings. This action may result in a conflict with him. Keep in mind that the route to the Witch’s Tower is patrolled by guards, so tread carefully as you traverse the castle.
Make your way up the stairs, then pass through the kitchen storage room. You’ll find a guard stationed within, with his back turned to the entrance. He can either be subdued with a knockout or eliminated silently. Search him for a Silver Doppelganger Badge. Continue ascending upstairs, step outside, and traverse the walkways that span across the courtyard.
Go up the stairs, then into the kitchen closet. There’s a guard inside who isn’t looking. You can knock him out or kill him quietly. Search him for a Silver Doppelganger Badge. Keep going upstairs, go outside, and walk across the bridges over the courtyard.
In this scene, you’ll witness a conversation between Istvan and Eric just before Eric departs. After the dialogue finishes, make your way to the opposite end of the courtyard. Stick to the southern edge to bypass a guard, then head towards the dining hall situated above the kitchen in the Crone’s tower. Here, two guards will be engaged in conversation and drinking. Shortly, one of them will exit, leaving the other dozing off at the table. With luck on your side, you can slip past this sleeping guard, ascend the stairs, and continue with your mission.
As you traverse, you’ll encounter a stone-paved corridor and a winding staircase. Continue ascending until you reach the top, then pass through the red door there. The doorway on your left at the top of the stairs leads directly to Istvan’s chambers.
Before going into Istvan’s room, head into the alchemy room to grab a Strong Painkiller Brew.
Kill Istvan Toth
As I’m wide awake when Henry shows up, we find ourselves in a nerve-wracking standstill. Gamers can take down Toth in two different ways:
- Kill him dishonorably
- Challenge him to a duel
Both options result in Istvan Toth’s demise; however, players have the option to choose a less honorable route to bypass a confrontation. Should a fight ensue, players will acquire Radzig’s Longsword as a reward, and they can then explore Istvan Toth’s chamber for Henry’s possessions and any hidden orders.
Grab Henry’s Things
In the upstairs sleeping quarters of Istvan’s chambers, you will discover a chest containing gear belonging to Henry, Godwin, and Zizka. This chest is nestled between one of the beds and a desk. Additionally, inside the chest, you will come across Otto von Bergow’s room key. After gathering his belongings, Henry must then search the rest of the room for von Bergow’s orders. Should players have a stealth outfit, they can now put it on.
Search Istvan’s Chambers
Players should look carefully in Istvan’s room as the orders are not there initially, but they might be hidden. Here are some areas to check:
1. Underneath furniture
2. Inside drawers and cupboards
3. On top of books or other items
4. Behind pictures or posters on the wall
5. In secret compartments or pockets in the room
6. Check under the bed or any other concealed spaces
7. Look for clues that might hint at where the orders could be hidden.
Happy hunting!
- The chest behind the bedroom door.
- The tall dresser against the back wall to the left.
Since Henry won’t find what he is looking for, he will go on to look inside the scribe’s chambers.
Search the Scribe’s Chambers
Players should search for the scribe’s quarters below, situated halfway down the spiral staircase in the main room. The instructions are not to be found here, but before departing, Henry needs to investigate these additional locations:
- The scrolls on the bookshelf next to the door
- The scrolls on the desk across from the door
- The brown cabinet against the back wall to the right
Empty-handed, Henry must go back across the courtyard to Otto von Bergow’s chambers.
Search Otto von Bergow’s Chambers
Upstairs within the Maid Tower, you’ll stumble upon my beloved Otto von Bergow’s chamber. Intriguingly, Godwin is seen attempting to gain entry. However, upon my arrival, he halts his efforts. We exchange a brief yet significant dialogue before proceeding into the room together.
1) Godwin will survey the room and locate the instructions hidden within a cabinet at its rear, situated behind the desk. Subsequently, the duo will make their way back to the dungeon to exit the castle, taking Katherine and Zizka along.
Take the Tunnel to Apollonia
The team will secretly exit the castle via an underground passageway that terminates at Apollonia. Upon reaching the tunnel’s end, Godwin uncovers von Bergow’s instructions, revealing he’s amassing troops for Kuttenberg. Consequently, the group needs to regroup with Mika, Katherine’s friend, to secure a cart and flee the vicinity.
In the mountainous region of Apollonia, numerous guards are on the hunt for the fugitives. Therefore, they dispatch Henry separately. The objective for players is to move stealthily past these guards while making their way toward Mika in a southerly direction.
Sneak to Mika and the Wagon
To reach Mika, it’s advisable to stay near the trees and maintain a safe distance from the road since the majority of the adversaries seem to be patrolling there. Your journey should take you southwards, aiming for the large boulders which you can pass through to evade detection.
1) On the map, you’ll find Mika’s position; continue your journey southwards towards that spot. In a secluded area, Mika is bound and under surveillance by a guard. You have two options: either subdue the guard quietly or knock him out, then engage in conversation with Mika.
Mika moved the cart southward with two of his team members, hence Henry needs to continue journeying across the mountains to locate them.
Find the Cart
I, as a fan, am passing along Mika’s instructions: Heading south through the rocky terrain, be mindful of any patrolling guards. If necessary, take out one or two with discretion, but there’s also an option to bypass them stealthily. Once you arrive at the double rock formation, your map will automatically update with the cart’s new location. Good luck!
Moving forward, stealthily head towards the southern direction, ensuring you pass by both enemy outposts. Over time, the number of guards patrolling will diminish until they’re completely absent. Once that happens, Henry will be secure and able to continue his search for the cart without any threat.
Approaching him, a scene unfolds where Henry arrives back with the wagon to retrieve Katherine, Godwin, and Zizka. Afterward, they journey together towards Kuttenberg.
Read More
- NFP PREDICTION. NFP cryptocurrency
- NRN/USD
- ONT PREDICTION. ONT cryptocurrency
- WIF PREDICTION. WIF cryptocurrency
- PUFF PREDICTION. PUFF cryptocurrency
- WLD PREDICTION. WLD cryptocurrency
- LDO PREDICTION. LDO cryptocurrency
- XRD PREDICTION. XRD cryptocurrency
- AI PREDICTION. AI cryptocurrency
- ATH PREDICTION. ATH cryptocurrency
2025-03-02 05:08