Why Is Bitcoin Doing a Weird Dance with RBI? Find Out! 🤔

Recently, a bigwig from the Reserve Bank of India, Mr. T. Rabi Sankar, decided to throw a wet blanket on Bitcoin’s parade. His words stirred up more fuss than a monkey in a pipe factory.
Recently, a bigwig from the Reserve Bank of India, Mr. T. Rabi Sankar, decided to throw a wet blanket on Bitcoin’s parade. His words stirred up more fuss than a monkey in a pipe factory.
Our favorite author of “Rich Dad Poor Dad,” Robert, took to his favorite soapbox-X (formerly Twitter)-to drop some wisdom bombs about how to endure the economic mess, with particular affection for getting your hands on assets that don’t mind crashing and burning. His advice? Think ahead, own things that generate cash, and get yourself some digital gold-yes, Bitcoin. Because what could possibly go wrong? 🤷♂️💻
![]()
Beta: A measure of how much your heartbeat quickens when you check it. Asset under management: The weight of everyone’s dreams, held prisoner in plastic.
![]()
Though their expense ratios-FTEC’s modest 0.08% against VGT’s 0.09%-suggest a rivalry of the most delicate sort, the disparity is trifling, akin to the difference between a pin’s placement in a gown. Their dividend yields, both hovering near 0.4%, might be likened to the careful balance of frugality and generosity in a household of means. Yet it is in the realm of assets under management that the distinction becomes most pronounced: VGT, with £130 billion to FTEC’s £16.7 billion, resembles the elder sister who has long since secured her place in society, while FTEC, though charming and well-connected, remains a younger lady with promising prospects.

Speaking of which, Arkham Intelligence dropped a bombshell: some ETH whale decided to go all-in with a $537 million long position at $3,175. Bold move, Cotton. But then ETH took a 4.7% nosedive on December 12th, and suddenly that whale’s position is underwater to the tune of $20.5 million. Ouch. 🦈💦

Behold, the survey of the American Association of Individual Investors, that most solemn of oracles, reveals a third of its acolytes shivering in the shadows of a looming bear market. A curious spectacle, this collective dread, as if the very air had been infected by a phantom recession, invisible yet palpable, like the ghost of a forgotten tax.
The bank framed the cryptocurrency not as a speculative asset, but as a hedge against the erosion of the Brazilian real. 🚨 What a noble act of wisdom! 🤯

XRP, that perennial underdog, is now playing tag with Ethereum and Solana. Hex Trust, the digital asset equivalent of a bank with a trust fund, has issued wXRP-because nothing says “I’m serious” like a 1:1 tokenized version of your coin. LayerZero’s OFT standard? More like “OFT standard” for the chaos. 🚨
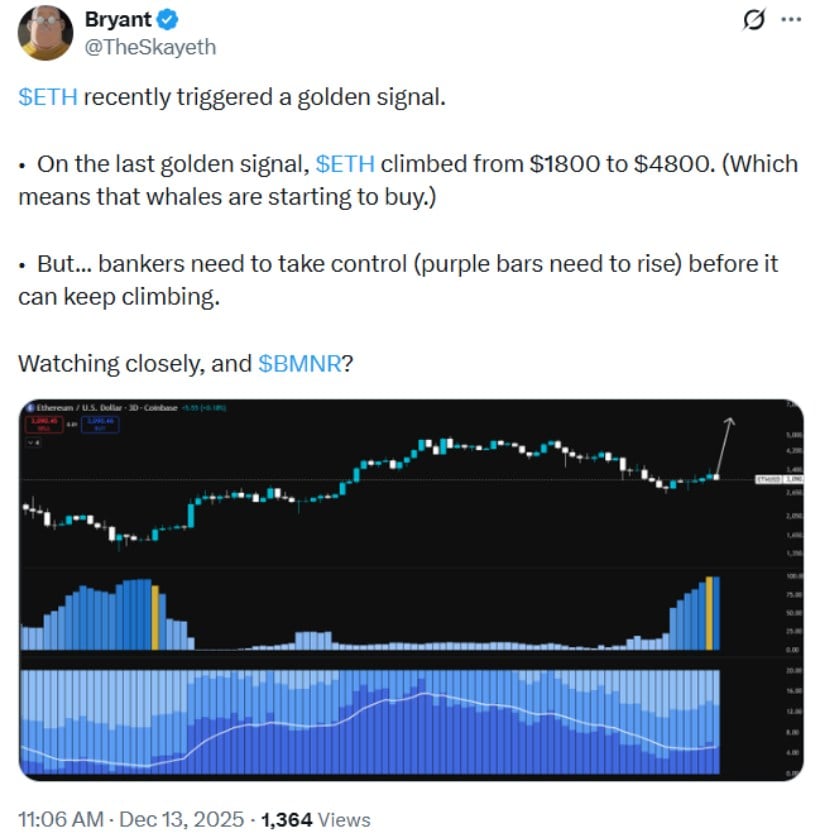
Lo, the so-called “golden signal” has captured the imagination of many, a mystical indicator tracking the movements of the mighty whales-those titans of the crypto ocean 🐳. Yet, as the sage Bryant warns, this signal, though historically prophetic (remember the ascent from $1,800 to $4,800?), is but a shadow, prone to lag in the maze of sideways markets 🧙♂️. The whales, it seems, are not mere traders but sages, their net holdings rising like the sun over a quiet horizon 🌅.
This has left smaller investors with shrinking influence over supply.